Take Linux For a Test Drive
Total Installation Time: Less Than Two Hours
If you want to uninstall Ubuntu, if it was installed as outlined here, all you have to is follow steps 1-3 again. The installer only lets you have one instance of Ubuntu 'inside' Windows like this, and will ask if you want to keep the existing installation, or delete it and start anew.
=============================================
Ok, installing linux is exponentially easier to install than it was three years ago, and it at least five times easier than windows. Observe:
Step 1
Download the .iso file here: http://www.ubuntu.com/getubuntu/download
Step 2
Either burn the iso file to a CD with Magic ISO http://www.magiciso.com/ or load the .iso as a virtual CD with Daemon Tools http://www.daemon-tools.cc/dtcc/downloa ... ewCategory
Step 3
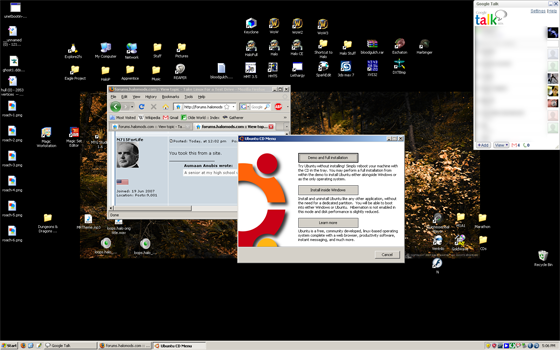
Put the CD in your drive while Windows is running (or mount it with Daemon Tools). A screen will automatically pop up. Answer some simple questions; and the install takes less than five minutes (I timed it).
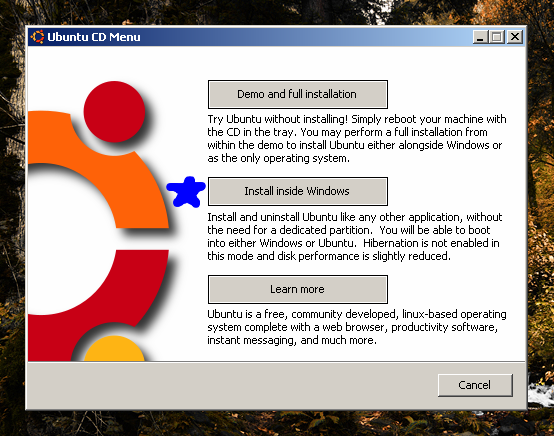
You want to 'Install Inside Windows'. This option makes a large file in windows' file system (I set mine to 15 GB) that Ubuntu recognizes as a hard drive. If you put the CD back in after installation is complete, you can uninstall with no side-effects.
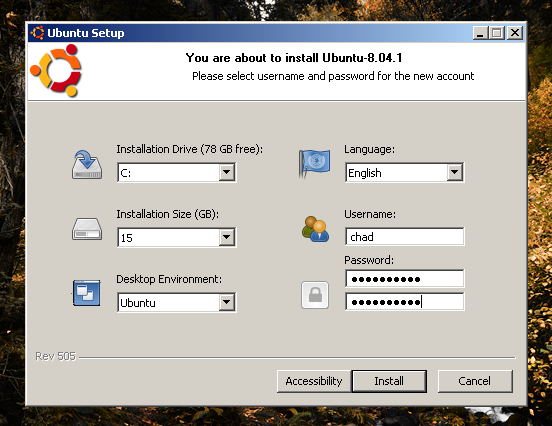
Choose the amount of space you want Ubuntu to have, and set your username and password (more users can be added once it is installed).
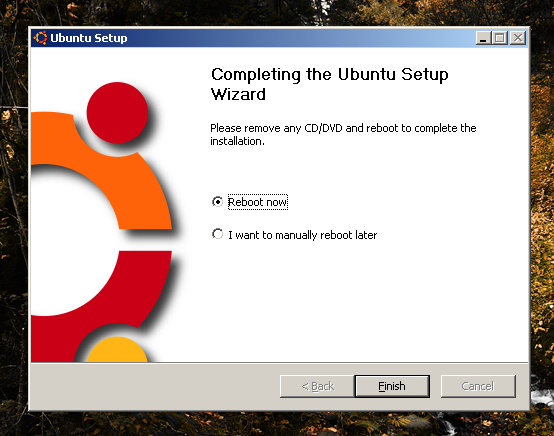
Done after less than five minutes! Restart your PC to see a choice between Windows and Ubuntu. If you select nothing, Windows automatically boots up after 5 seconds.
Step 4
Ok, after you select Ubuntu the first time, the installation is finalized (again, less than 5 minutes) and the computer will restart again. Select Ubuntu to view your brand new desktop! Click the icon in the upper right corner that looks like an orange blot with an arrow to update your system.
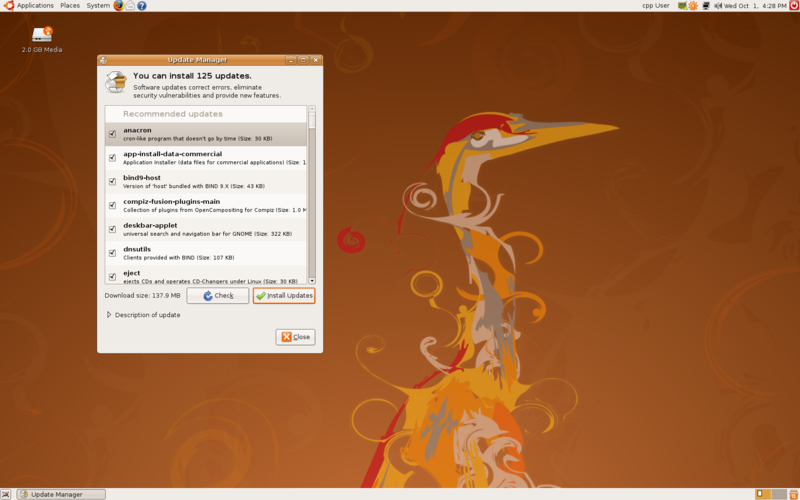
Step 5
While we're waiting for the updates to finish, click Applications > Add/Remove in the upper left corner. Than select "all available applications" up top. This lists all programs available through the Ubuntu repositories. Just check a program to install it or uncheck a program to remove it. You'll want the packages "Advanced Desktop Effects Settings", "Compiz Fusion Icon", "Desktop Effects", and "Ubuntu Restricted Extras" to start. This will install Compiz, Java, and Flash Player. Both the updater and the program installer use synaptic, however, so wait for the updates to finish before clicking "apply".
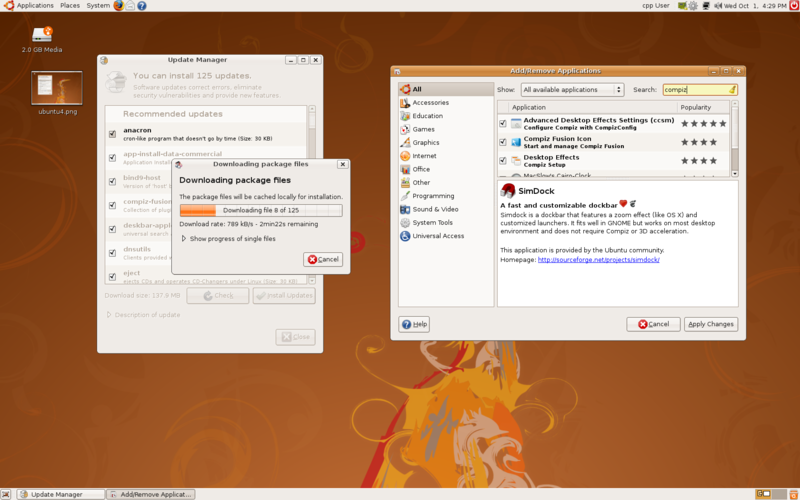
Step 6
While you're waiting for all these packages to install, head over to http://gnome-look.org/ and get a cool wallpaper. You can also adjust the system theme in System > Preferences > Appearance
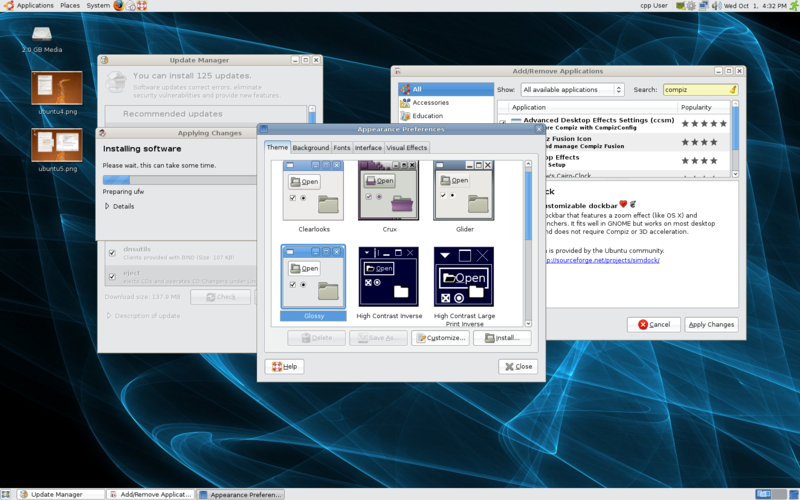
Step 7
While you're in Appearances (after synaptic has finished), go to the last tab and select extra desktop effects. It should tell you that you don't have the required drivers for 3d acceleration, then ask if you want to install them. Sit back and relax as Ubuntu automatically locates the correct video driver and installs it.
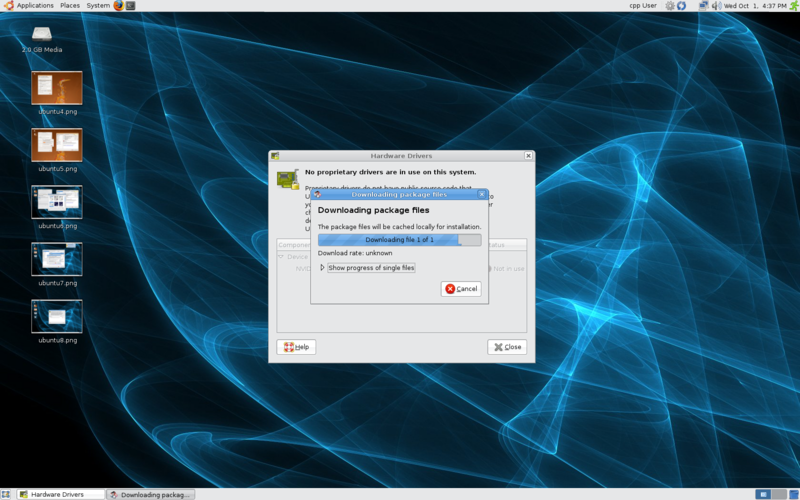
Step 8
Reboot to finalize system changes. To enable Compiz, run Applications > System Tools > Compiz Fusion Icon. To make Compiz automatically run on startup, go to System > Preferences > Sessions and click new. Name it Compiz and put "fusion-icon" (no quotes) into the 'command' field.
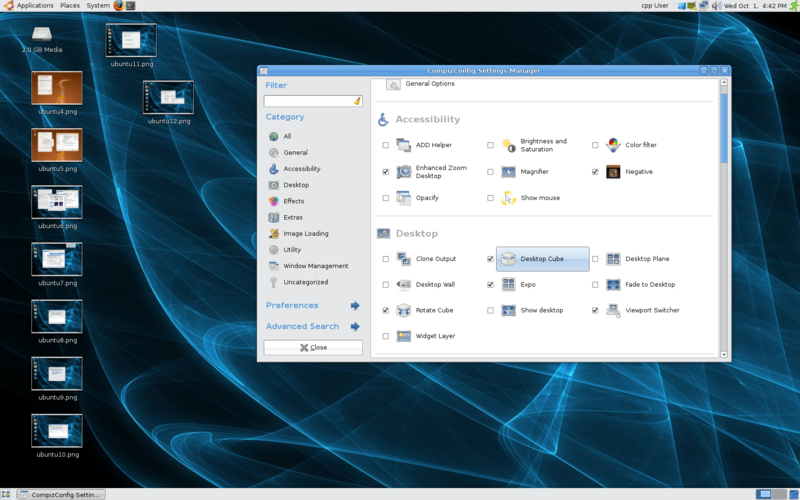
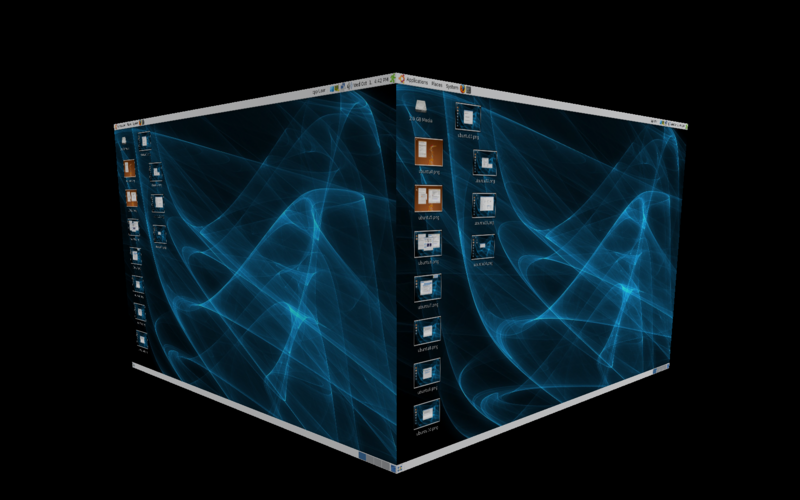
To change Compiz's settings, right click the blue box in the upper right corner and select the settings manager. Enable Desktop Cube, Rotate Cube, Cube Caps, and Wobbly Windows to start with (Answer yes if it asks to disable another plugin). Water effects are cool, as are drawing with fire. Check the ones you want, uncheck them later if you like.
Enjoy!
Ways installation has improved in two and a half years
-No tricky dual-booting; the Wubi installer takes care of everything.
-The metacity drivers (default video drivers) have improved drastically. You used to have to spend at least an hour adjusting your xorg.conf file if you had a screen resolution above 1024x768.
-Click, reboot; Compiz done. Seriously, that took me three weeks of configuration on my old ATI card (back when Beryl was still the way to go)
-Automatic video driver installation?
Last edited by WaeV on Sat Oct 25, 2008 3:50 pm, edited 2 times in total.
- M715ForLife
- Posts: 555
- Joined: Tue Jun 19, 2007 12:12 pm
- Location: Posts:9,001
- Contact:
- Cryticfarm
- Posts: 3611
- Joined: Sat Dec 09, 2006 7:23 pm
- Location: canada
- Contact:
- Cryticfarm
- Posts: 3611
- Joined: Sat Dec 09, 2006 7:23 pm
- Location: canada
- Contact:
Sorry for not replying, I wondered where this topic had disappeared to. (It was originally posted in Cafe - my bad) Also, I fixed one of the broken images.
What IM protocol do you want to use Cryticfarm? I can make a mini-tut on how to do that if you want.
Here's some proof, if you'll accept it:
What IM protocol do you want to use Cryticfarm? I can make a mini-tut on how to do that if you want.
No I didn't. Although I guess I can take that as a compliment on the quality of the tutorial.M715ForLife wrote:You took this from a site.
Here's some proof, if you'll accept it:
- M715ForLife
- Posts: 555
- Joined: Tue Jun 19, 2007 12:12 pm
- Location: Posts:9,001
- Contact:
Oh. I saw a tut that looked alot like this one. I jumped to conclusions.WaeV wrote:Sorry for not replying, I wondered where this topic had disappeared to. (It was originally posted in Cafe - my bad) Also, I fixed one of the broken images.
What IM protocol do you want to use Cryticfarm? I can make a mini-tut on how to do that if you want.
No I didn't. Although I guess I can take that as a compliment on the quality of the tutorial.M715ForLife wrote:You took this from a site.
Here's some proof, if you'll accept it:
If you could do an AIM Tut, that would be great!
Whoops, forgot about this.
The program you want to use is Pidgin, which comes preinstalled.
Simply navigate to Accounts > Add/Edit. Select the chat protocol (AIM, MSN, Googletalk, Jabber, etc.) and enter your username. I entered my password as well, so it automatically signs in. If you want Pidgin to start when you login, go to System > Preferences > Sessions and click new. Name it Pidgin (or whatever, really) and put "pidgin" (no quotes) into the 'command' field.
Here's a screenshot of the windows version, which is identical.
Last edited by WaeV on Fri Nov 14, 2008 9:20 pm, edited 2 times in total.
- guysullavin
- Posts: 1542
- Joined: Sun Sep 16, 2007 6:11 pm
- Location: Niagara-on-the-lake
- Contact:
lets say I have 2 250 GB hard drives on my computer, and i like using ubuntu even as a shared OS, would i be able to install ubuntu on the OTEHR hard drive and be able to boot unbuntu from the screen that says boot from disk etc.
if you dont get that heres a little pic for you
Not Removing until Prototype comes out. Started 1/7/2009
obj1: DUDE'S GOT A POINT....I GIVE THIS PRODUCT A TRY....HELL WHAT COULD GO WRONG!
waev: caps lock might
That is definitely possible, but not the way I explained above, which is uber-easy but is less versatile.
The method I explained above uses Wubi, which puts a large file on C:\ which acts like a partition. If you want to have Ubuntu on a second hard drive, you need to do actual partitioning.
To do a traditional install of Ubuntu, you need to boot from the live CD. Burn the CD, then leave it in the tray and reboot. While your PC is booting, enter BIOS setup. (BIOS is the text that flashes across your screen before XP loads - I get into mine by pressing [Del]) Make sure your BIOS will boot from the CD drive before the Hard Drive. Save changes and exit.
The Live CD will ask you for your language, then have a list of options, Just pick the normal install. After a few minutes, Ubuntu will be running from the CD! You can update, install programs, use the internet etc. (as of 8.10 - released Oct 08 - wireless is supported out of the box!) The only difference between the live CD and a full install is that changes aren't saved, so if you reboot the CD will revert to pristine condition with no updates etc.
There's a big fat INSTALL icon on the desktop that's hard to miss. Juts follow the simple instructions.
To get the results you're looking for you can tell it either to automatically reformat and use a whole drive or to manually partition. Automatic is easier (duh). If you want to manually partition, you want an ext3 partition as / and a swap partition as swap. Ext3 is where the files will go, swap is like extra RAM. Swap shouldn't be bigger than 2GB (it's just unneccesary.) Again, auto handles swap and everything.
As long as you don't go into the advanced menu on the last step, the installer will automatically install GRUB (GRand Unified Bootloader). It works by putting a pointer on the first itty bitty index sector of your HD, which tells your BIOS to look at your linux partition's /boot folder, which is where GRUB is contained. (If you wanted to know)
Once everything is installed, it's pretty much the same as above. If you want to mess with the GRUB menu (to change the default OS and such) type "sudo gedit /boot/grub/menu.lst" into the terminal. That's LST by the way, not 1st. that confused me when I started.
[/wall of text]
Note: If you use a windows CD to repair your windows installation, it will overwrite the GRUB pointer. To restore the pointer, boot up the live CD and run the following from the terminal:
sudo grub
find /boot/grub/stage1
setup (hdx) <<where x is the number put out by the last command
quit
reboot
- guysullavin
- Posts: 1542
- Joined: Sun Sep 16, 2007 6:11 pm
- Location: Niagara-on-the-lake
- Contact:
You have to be using 8.10 Intrepid Ibex for wireless to work out of the box. If that is the version you're using, there should be an icon in the upper right corner to deal with internet connections. I don't think it connects automatically, for security purposes no doubt. Just click on the wireless network you want to connect to.
If that doesn't work, try searching google or http://ubuntuforums.org/index.php with your specific problem.
- guysullavin
- Posts: 1542
- Joined: Sun Sep 16, 2007 6:11 pm
- Location: Niagara-on-the-lake
- Contact:
yea, i follow the directions for the wireless network thing in the help section but when i go to
system>administrative(or something similar) there isn't a network option, but a network tools option which is nothing like the help section. help!
Not Removing until Prototype comes out. Started 1/7/2009
obj1: DUDE'S GOT A POINT....I GIVE THIS PRODUCT A TRY....HELL WHAT COULD GO WRONG!
waev: caps lock might
What? I didn't say anything about a help file, or even going into the System > Administration menu.
So again, which version are you using, 8.04 Hardy Heron or 8.10 Intrepid Ibex?
If you are using Intrepid, one of the icons in the upper right corner should deal with wireless networks. Select the one you want to connect to and it starts requesting an IP address.
So again, which version are you using, 8.04 Hardy Heron or 8.10 Intrepid Ibex?
If you are using Intrepid, one of the icons in the upper right corner should deal with wireless networks. Select the one you want to connect to and it starts requesting an IP address.
- guysullavin
- Posts: 1542
- Joined: Sun Sep 16, 2007 6:11 pm
- Location: Niagara-on-the-lake
- Contact:
- guysullavin
- Posts: 1542
- Joined: Sun Sep 16, 2007 6:11 pm
- Location: Niagara-on-the-lake
- Contact:
yea i tried that too, but when i just click on it it sends me to VPN connections and when i right click it it sends me to the ethernet connections, but it ahs a tab to the top-right about wireless connections, so i click it, and i fidn an empty list, so i guess that i have to type in manually the wireless network, so i add in "Apple Network 330f80" to the SSID and then nothing happens
WTF AN OS SHOULDN'T BE THIS HARD!! i mean, vista was just disk in, click install, and poof. then when you bought the USB card for wireless internet then just inserted the driver disk and tadaa, wireless internetz includingz halomodz
imma try to see if ubuntu will read my USB wireless card Driver software
Not Removing until Prototype comes out. Started 1/7/2009
obj1: DUDE'S GOT A POINT....I GIVE THIS PRODUCT A TRY....HELL WHAT COULD GO WRONG!
waev: caps lock might
Great tut. I just tried the install in windows thingy, because I'm a complete linux noob and wanted to see what the fuss was about. It's pretty nice. I do have a question though. Is it possible to browse the contents of my hard drive not contained in the 15GB file Ubuntu is installed it? The Disk Usage Analyzer says I have 450GB..... that's 200 more than before I installed linux...
Those who can't play, mod.
And those who can't mod, mod PC.