[Video Tut]Making your first Halo 2 Vista Map
-
BrainEater
- Posts: 219
- Joined: Tue Nov 22, 2005 6:48 pm
- Contact:
|
|
[Video Tut]Making your first Halo 2 Vista Map
All you greenhorns that dont know how to make a Halo 2 Vista map....This is going to be your lucky day!
http://files.filefront.com/Halo2_Map_Tu ... einfo.html
Enjoy.
http://files.filefront.com/Halo2_Map_Tu ... einfo.html
Enjoy.
- ExileDestruction
- Posts: 202
- Joined: Mon May 14, 2007 12:40 pm
- Location: Canada
-
BrainEater
- Posts: 219
- Joined: Tue Nov 22, 2005 6:48 pm
- Contact:
|
|
-
BrainEater
- Posts: 219
- Joined: Tue Nov 22, 2005 6:48 pm
- Contact:
|
|
- HPDarkness
- Posts: 1925
- Joined: Tue Mar 22, 2005 6:57 pm
- Location: Boston
- Contact:
|
|
-
BrainEater
- Posts: 219
- Joined: Tue Nov 22, 2005 6:48 pm
- Contact:
|
|
- Cryticfarm
- Posts: 3611
- Joined: Sat Dec 09, 2006 7:23 pm
- Location: canada
- Contact:
-
KRZYkiller9
- Posts: 13
- Joined: Sun Feb 27, 2005 4:09 pm
- Contact:
thanks for the tutorial. everything works fine until i get to the part where you link the sphere and the box. You jerked the mouse around alot and i had no idea what i was supposed to link. The main problem is that when i try to apply the color changes and things from the material editor, it doesn't make it blue like your box....and the sphere doesn't go away. Can you tell me what i'm doing wrong?
-
BrainEater
- Posts: 219
- Joined: Tue Nov 22, 2005 6:48 pm
- Contact:
|
|
First of all, the sphere isnt supposed to disappear, its the frame for the level.
For your linkage problem, you have to click on your box, then select the Link tool, and link the two together.
To link them together, click on the box, then click on the sphere. Then click the Select By Name button. It should show up as either
b_levelroot
or
b_levelroot
your_box_name
Box name stand for what you named your box.
For your Material Editor problem, you may have forgotten to:
Set the Material ID's
Or
Set the Colors.
-
Patrickssj6
- Posts: 5426
- Joined: Sat Jul 24, 2004 12:12 pm
- Location: I'm a Paranoid
- Contact:
|
|
|
No offense but people please don't take reference to this tutorial.
He explains almost nothing and from my point has no idea what he is partly doing.
More crits:
http://www.h2vista.net/forums/showthread.php?t=3157
Please wait until a better tutorial comes out.
He explains almost nothing and from my point has no idea what he is partly doing.
More crits:
http://www.h2vista.net/forums/showthread.php?t=3157
Please wait until a better tutorial comes out.
...left for good
-
BrainEater
- Posts: 219
- Joined: Tue Nov 22, 2005 6:48 pm
- Contact:
|
|
- McJix
- Readers Club
- Posts: 199
- Joined: Sun Jun 10, 2007 5:21 pm
- Location: Rasterzering....001%, 007%...
I'd like to personally thank and criticize your video.
First off:
I'd would like to thank you, as your video taught me what I was doing wrong with making maps, and finally made it so the "simple" box level could be compilied. It helped me, because the Bungie tutorial is poorly written.
But, ...
I felt that your map was too simple to teach. It left me wondering, "Do I do the same for more complex maps?" (Meaning 2+ objects), or do I do something different? I was confunsed.
Nextly, no matter how close I follow your mapping part with 3ds Max, then I go to compile it, and it works! Or so I thought. When I loaded the .scenario in Sapien, it gets to the part where it says "Part 2 of 3, Compiling Scripts", or something like that. It then comes up with an Error saying "File is corrupt and can not be loaded. Sapien will now close". This part really left me out in the cold, becuase in your video you did not explain what we did wrong if we got this error.
Also, to add to that, your materials in the video were all the way done, instead of walking us through it (What I mean is that his 3ds Max scene was already done, and his scenario was already done, and his level was already done... ect.). You didn't explain what we should do to make that .scenario work, becuase after that error, I thought I had to do something to it in Guerilla. I'd be off better if you walked us through the whole thing, step-by-step and explain it.
I know you've already heard this comment quite a bit, but your video was rather un-professional. Sure, it taught me some things, but all those distractions took away from it. When you do your video, it should be in a quite, place where little out-side noise can be heard. I don't want to hear your mom yelling at your dog to shut-up. I don't want to hear your dog barking 3 feet away from the mic. Try closing your door next time.
I hope you take this and others into account on making your next tutorial, and try making it slightly more complex than just a box (And I hope it's soon too, I have the Trial Version of 3ds Max 7 and only 27 days left). Overall, I'm looking forward to seeing your next video and watching it, to see the areas that left me out in the cold when I tried making my own hand last time.
Peace.
-
CowFromMars
- Posts: 29
- Joined: Thu Apr 07, 2005 11:07 pm
- Contact:
McJix: Load up the scenario in Sapien WITH Lightmaps once, or else it comes up with that error. I guess he failed to mention that you do need to do that, at least I did, and many other people. Hope that helps.
Also, I was too wondering how we would go about doing this with multiple objects, as I am very new to 3ds Max.
This tutorial ( http://kororigaming.com/h2vista/noob.htm ) helped a bit, but i got stuck at 'attaching' the extruded part to the wall. .
.
Also, I was too wondering how we would go about doing this with multiple objects, as I am very new to 3ds Max.
This tutorial ( http://kororigaming.com/h2vista/noob.htm ) helped a bit, but i got stuck at 'attaching' the extruded part to the wall.
Signatures are for losers.
- McJix
- Readers Club
- Posts: 199
- Joined: Sun Jun 10, 2007 5:21 pm
- Location: Rasterzering....001%, 007%...
Thanks man, that actually worked!CowFromMars wrote:McJix: Load up the scenario in Sapien WITH Lightmaps once, or else it comes up with that error. I guess he failed to mention that you do need to do that, at least I did, and many other people. Hope that helps.
Also, I was too wondering how we would go about doing this with multiple objects, as I am very new to 3ds Max.
This tutorial ( http://kororigaming.com/h2vista/noob.htm ) helped a bit, but i got stuck at 'attaching' the extruded part to the wall..
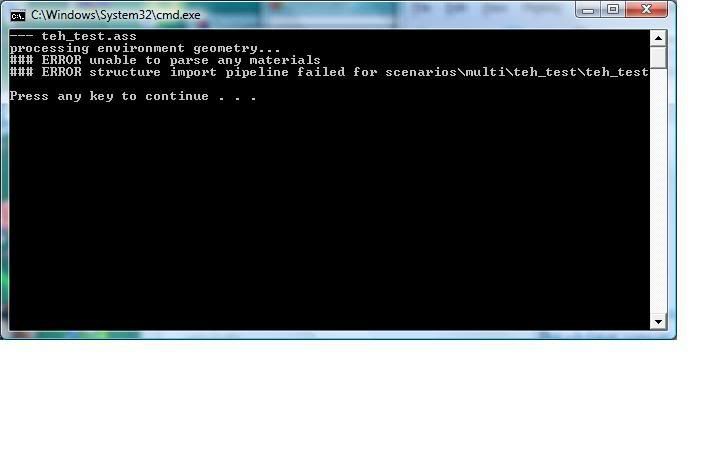
ive tried twice and i keep getting this when i try to compile the .ass file, could you provide the 3ds file for refrence?

EDIT: ok now when i load sapien with the .scnerio it says its corrupt when it trys to load the scripts.
edit: nm i got it, i had to click compile and light then it worked just fine

EDIT: ok now when i load sapien with the .scnerio it says its corrupt when it trys to load the scripts.
edit: nm i got it, i had to click compile and light then it worked just fine

-
speedy11131
- Posts: 7
- Joined: Wed Jan 18, 2006 3:51 pm
- Contact:


