3ds Max: UVW Unwrapping For Dummies

Finish a new model/mesh? Got something you're working on? Finish a new map? Here's the place to post it for feedback and whatnot.
Post Reply
cooldude5990


Posts: 540
Joined: Tue Jan 20, 2004 12:03 pm

3ds Max: UVW Unwrapping For Dummies

Post by cooldude5990 »

For all of you that want to learn how to unwrap here is a tutorial i made. In this tutorial you will unwrap an hk ump clip.
I NOW HAVE THE ZIP!
Thanks Wraith for uploading the max files.
http://bellsouthpwp.net/c/o/cold_fusion ... torial.zip
If you want a .3ds file ask me on aol
Sorry for the different size images i dont know why it came out like that.
Things you need
- Max 7 (to open my max file, talk to me on aol ill try to get a 3ds)
- Texporter (free download search google)
Image
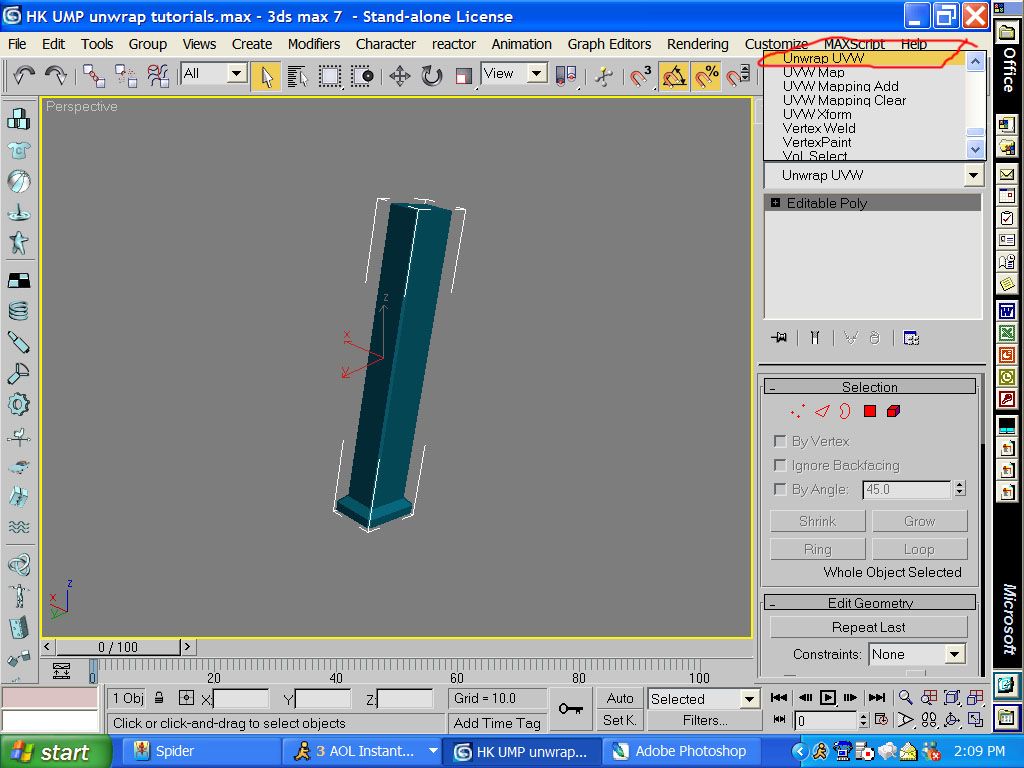
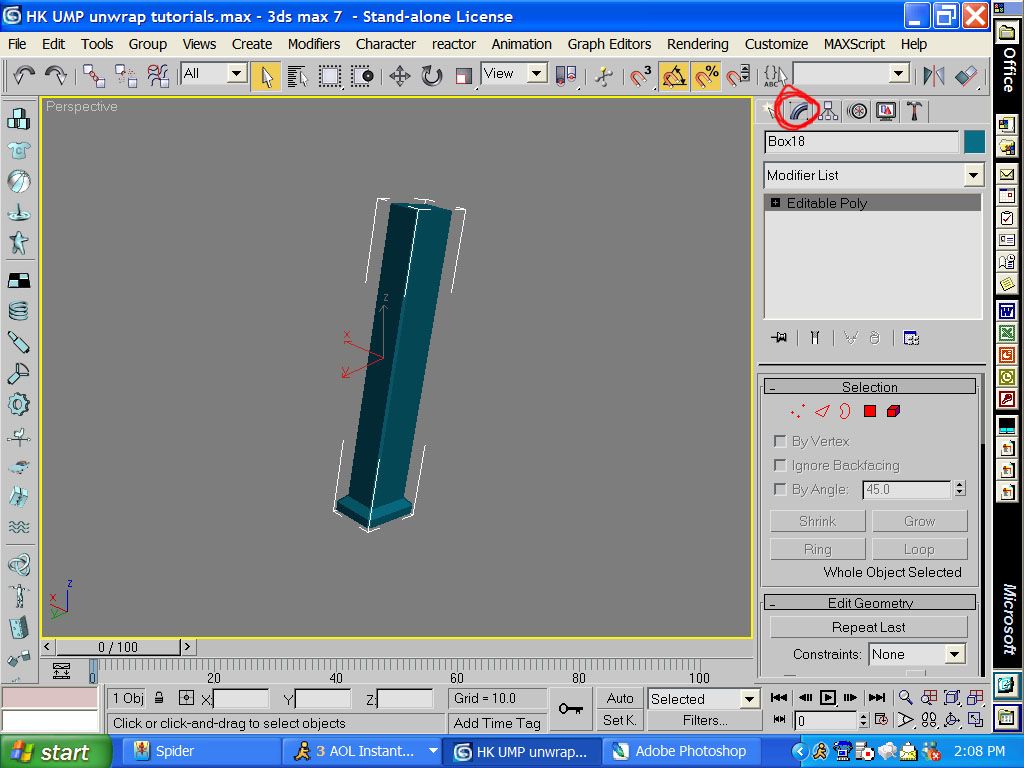
first go to the modifier tab
Image
then click on unwrap uvw
Image
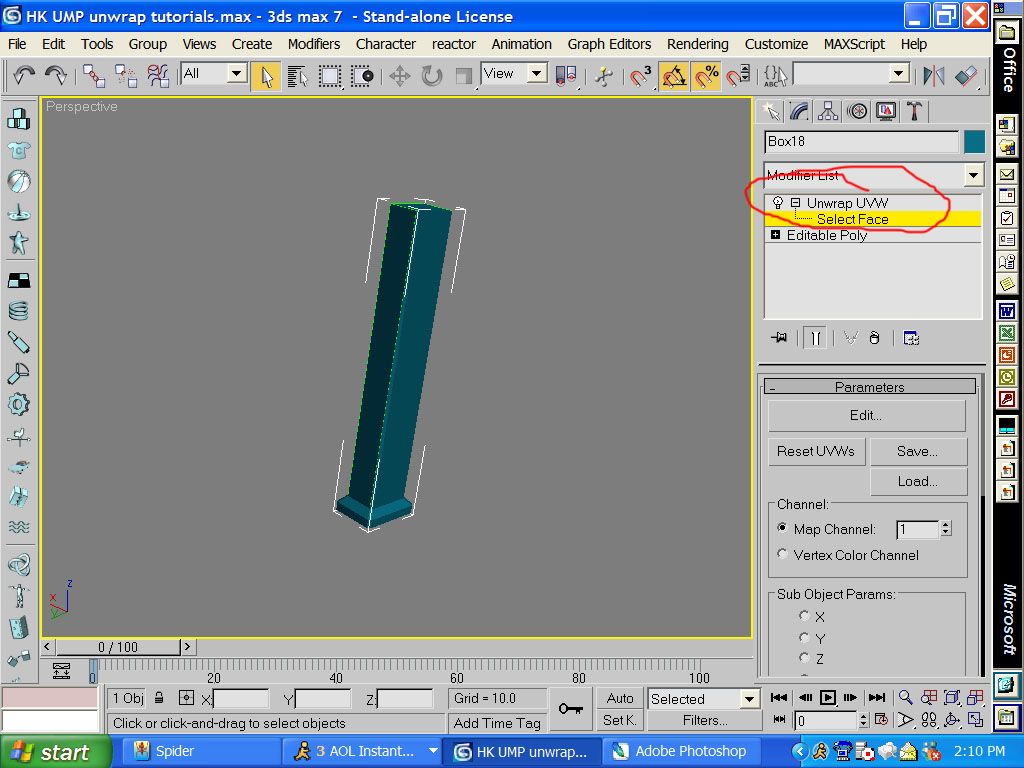
then click on the + sign and click on select by face
Image
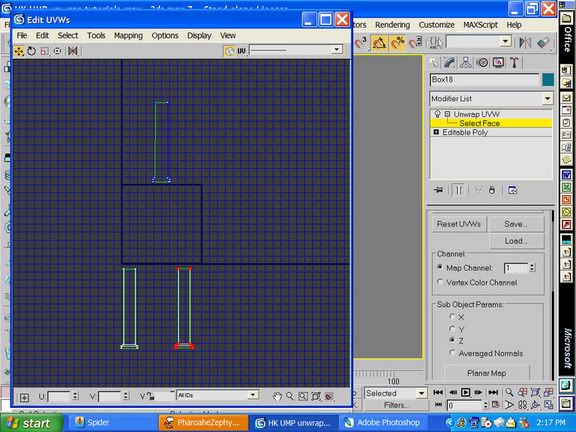
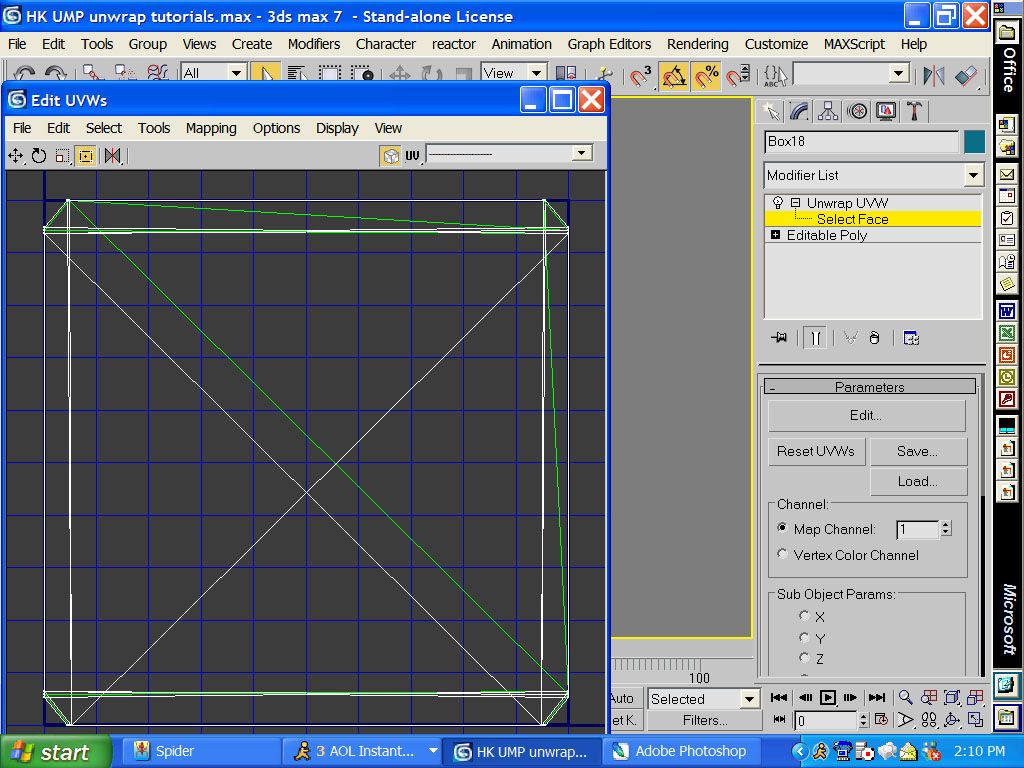
when you click on edit this is the screen that you should see.
Image
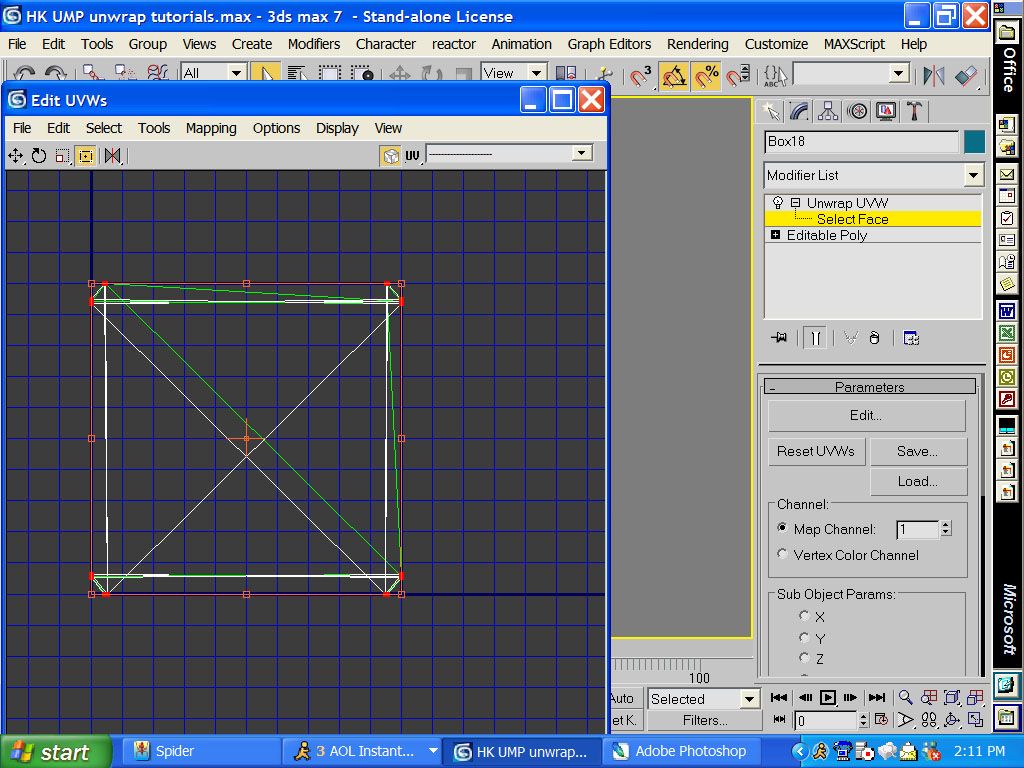
then drag your mouse over everything in the edit box.
Image
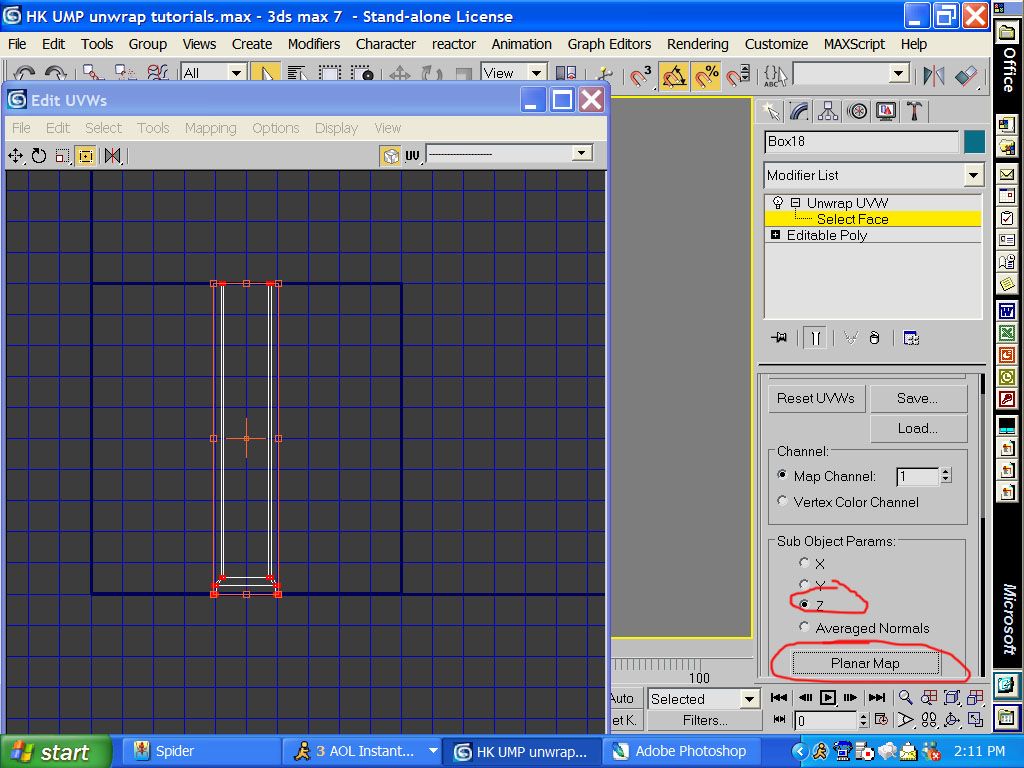
then click on object params z then planner map.
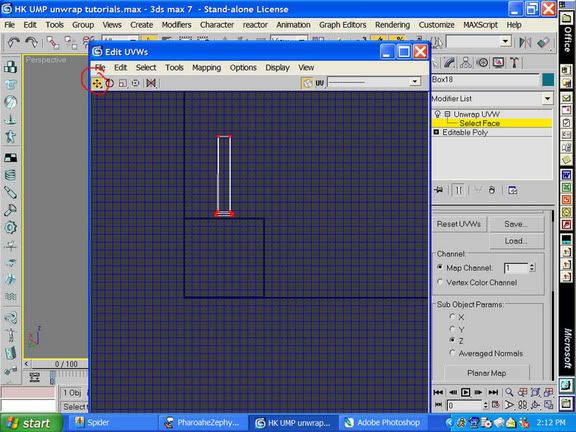
Image
then move that up out of the box. this will be a visual on what you did not map on the object yet. If you ever wonder what you did not map and something is there just drag you mouse over it and it will select the face on the model.
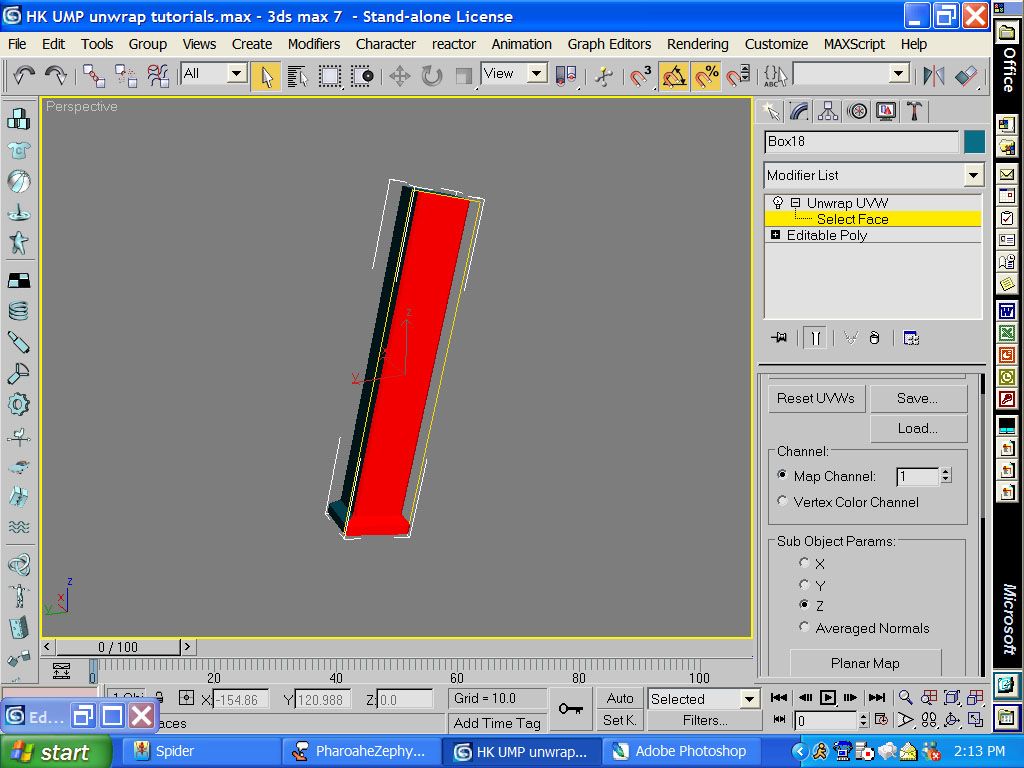
Image
now select the faces on the left side of the model (including the ones that are chamfered)
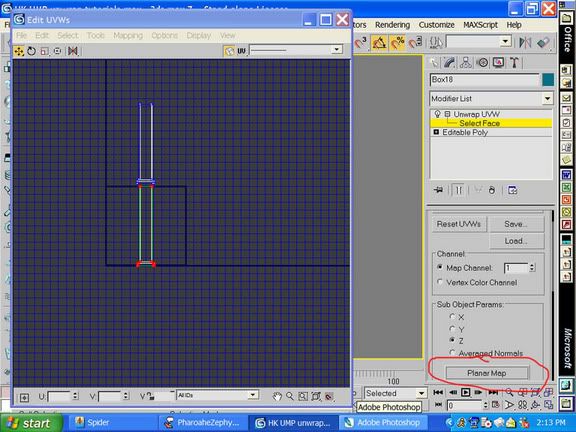
Image
then click on planner map with it still on z and it will come up in the edit box. (you can close the edit box if you want when you have to do stuff in the perspective screen).
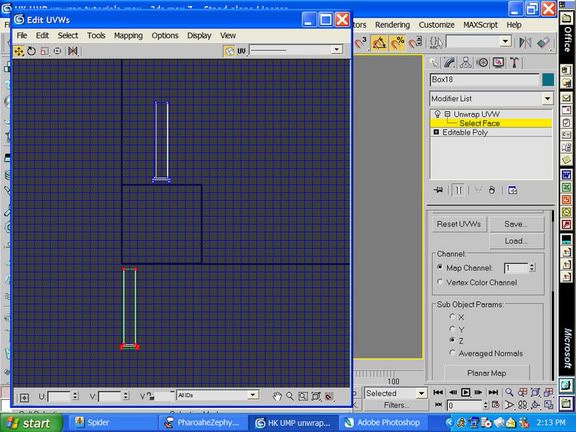
Image
then what you want to do is move the side of the clip down out of the box.
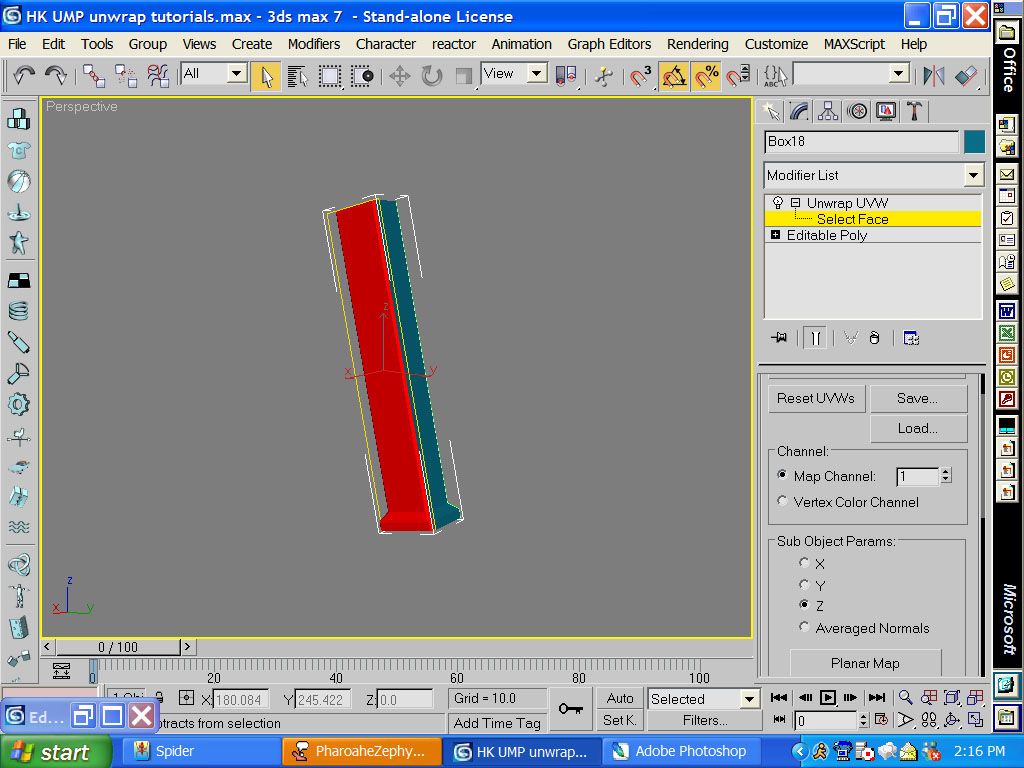
Image
now select the faces on the right side of the clip.
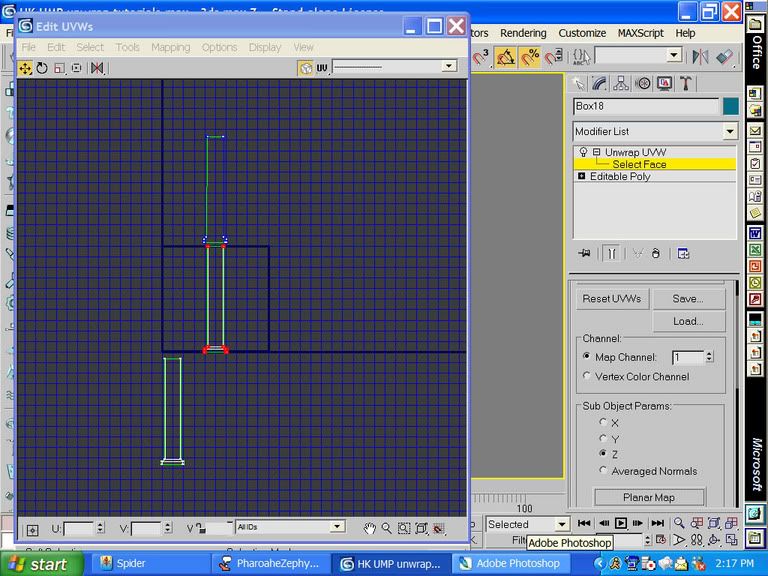
Image
you can click planner map again.
Image
then move it down next to the other side
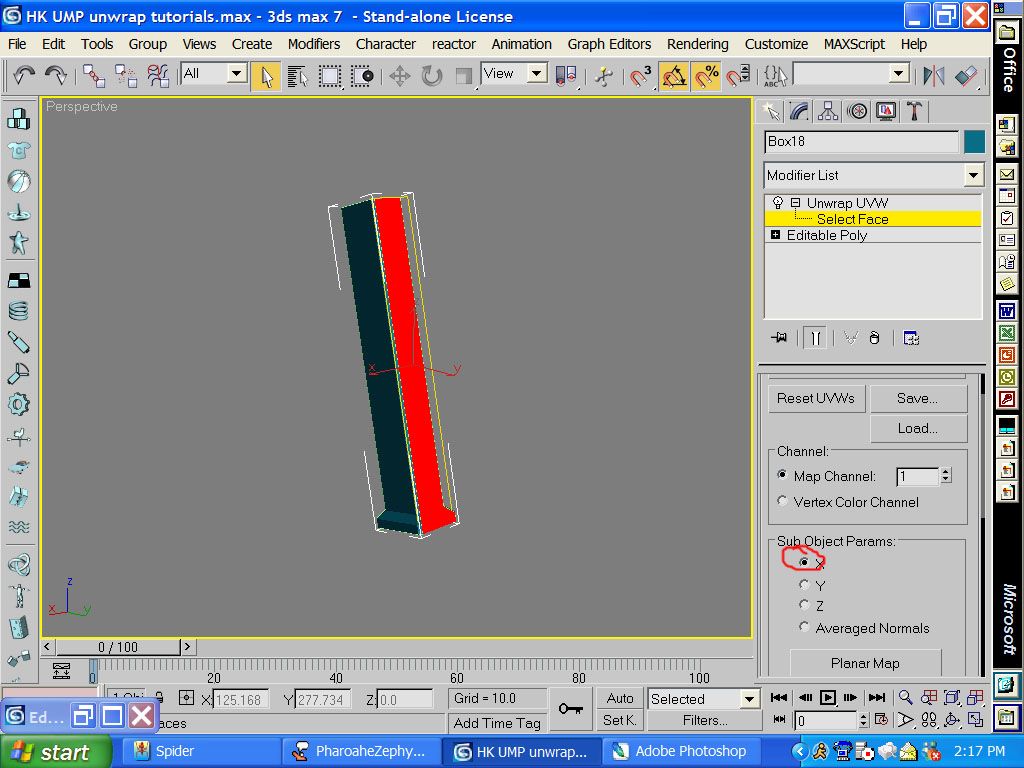
Image
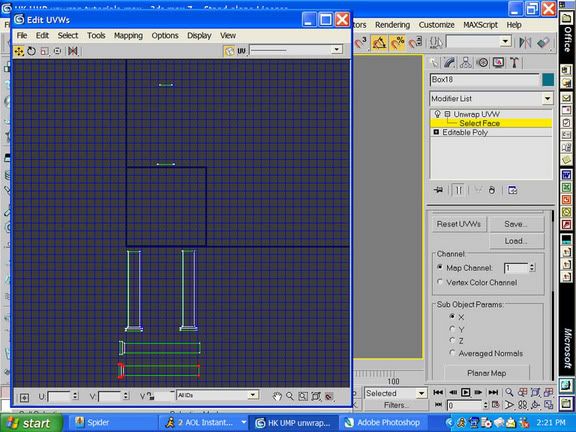
then select the front faces and make sure you click on x mapping. and you can click on planner map now
Image
and you can click on planner map now
Image
now move it down under the current pieces
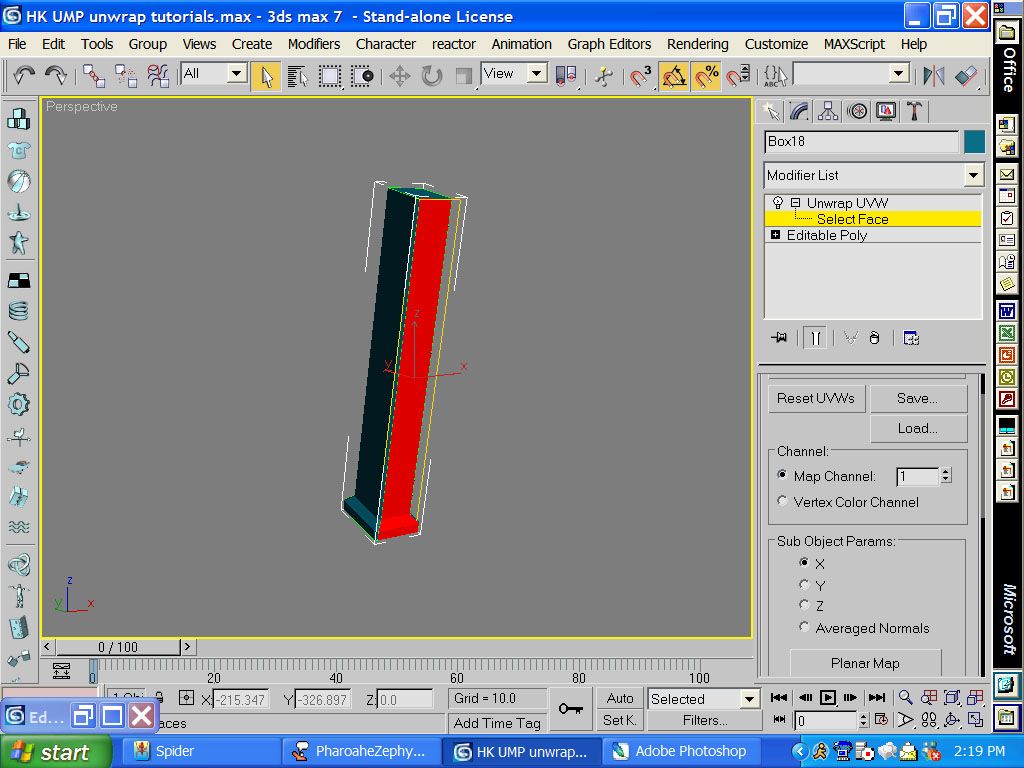
Image
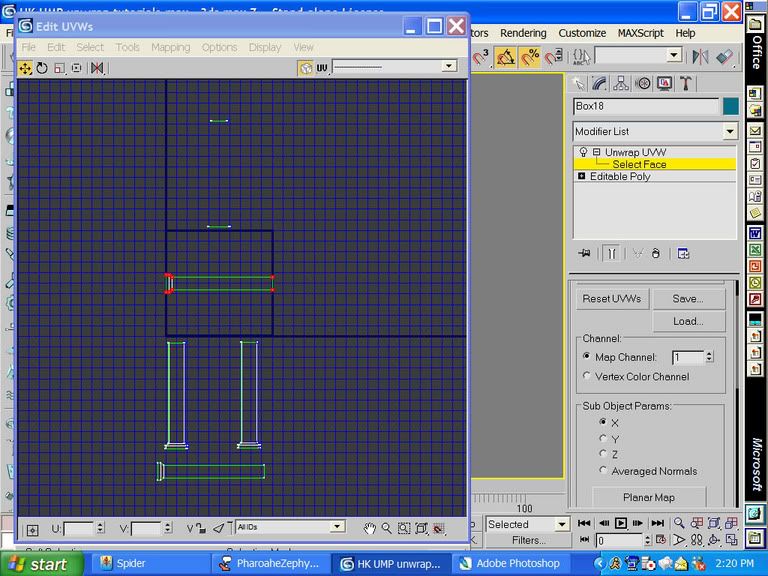
now click on the back part of the clip
Image
planner map it
Image
move it under the pieces you have
Image
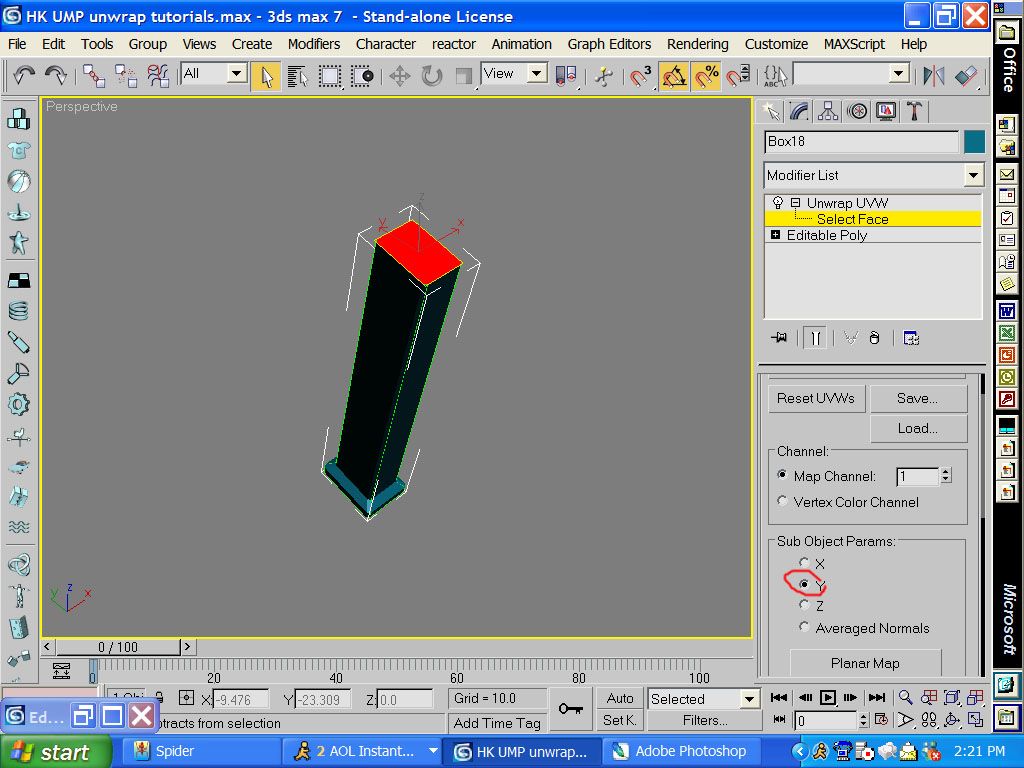
now click on the top of the clip with y mapping selected
Image
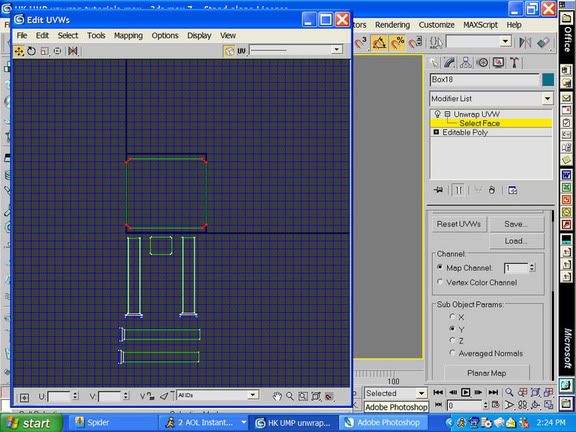
now planner map it
Image
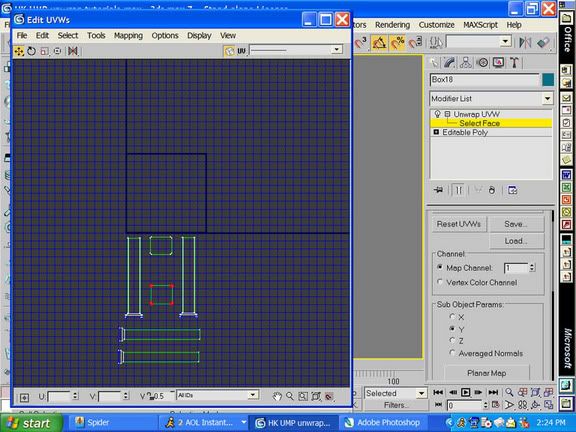
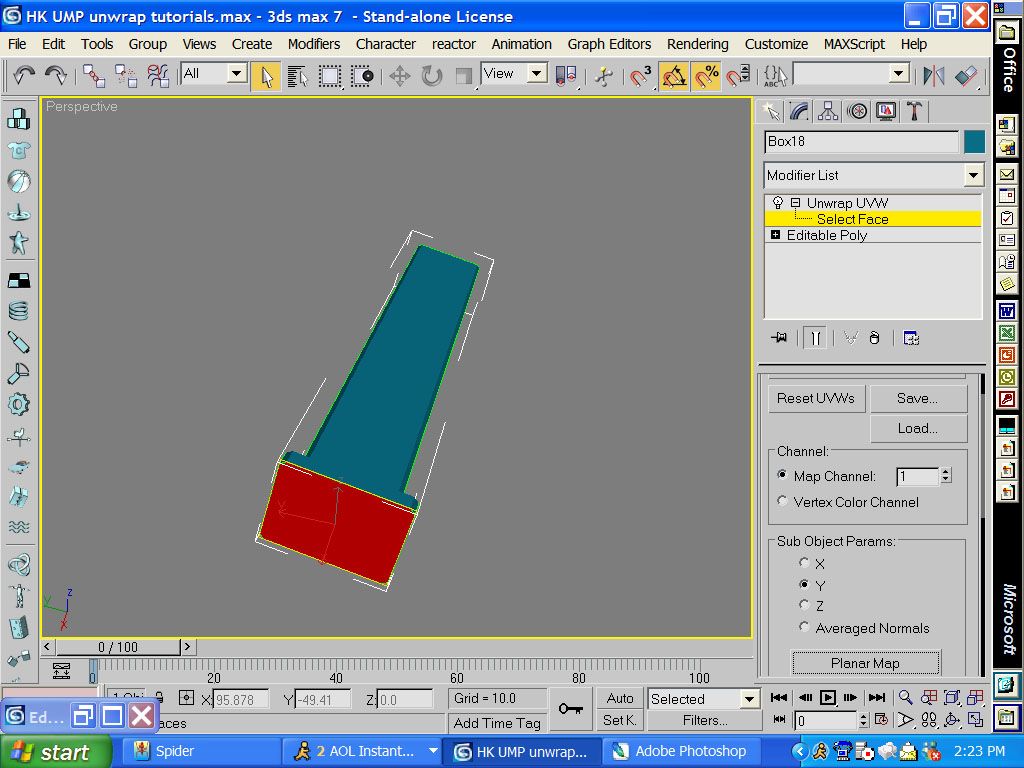
when you map it it will be really big so just scale it down to about the above size
Image
then you can move it inbetween the two clip pieces
Image
now click on the bottom peices
Image
and click on planner map again
Image
this one is big too so you can scale it down and move it between the clips again.
Image
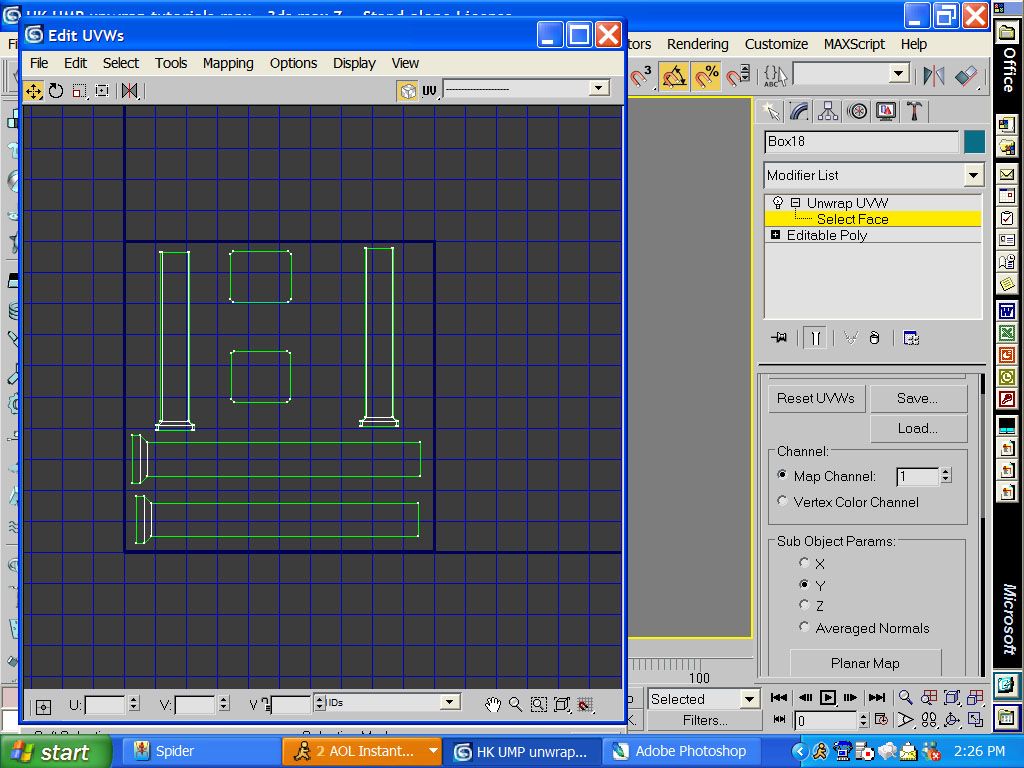
Now you have to move it in the box in the middle like i have done in the above pic. You will have to scale some stuff down to make it fit.
Image
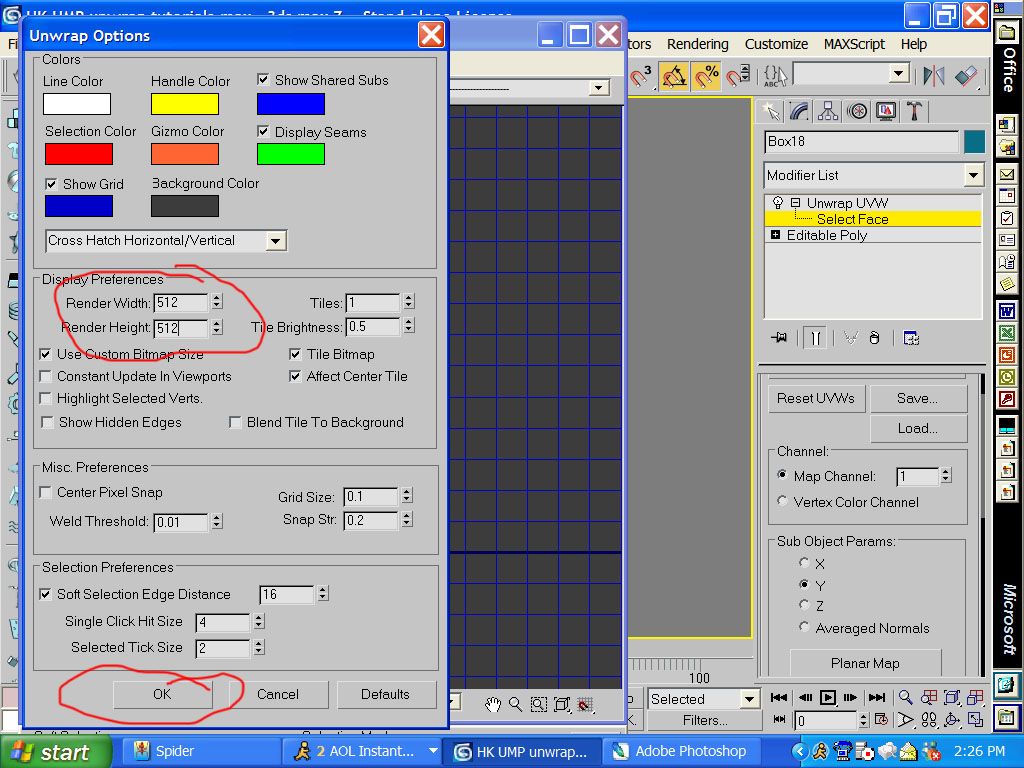
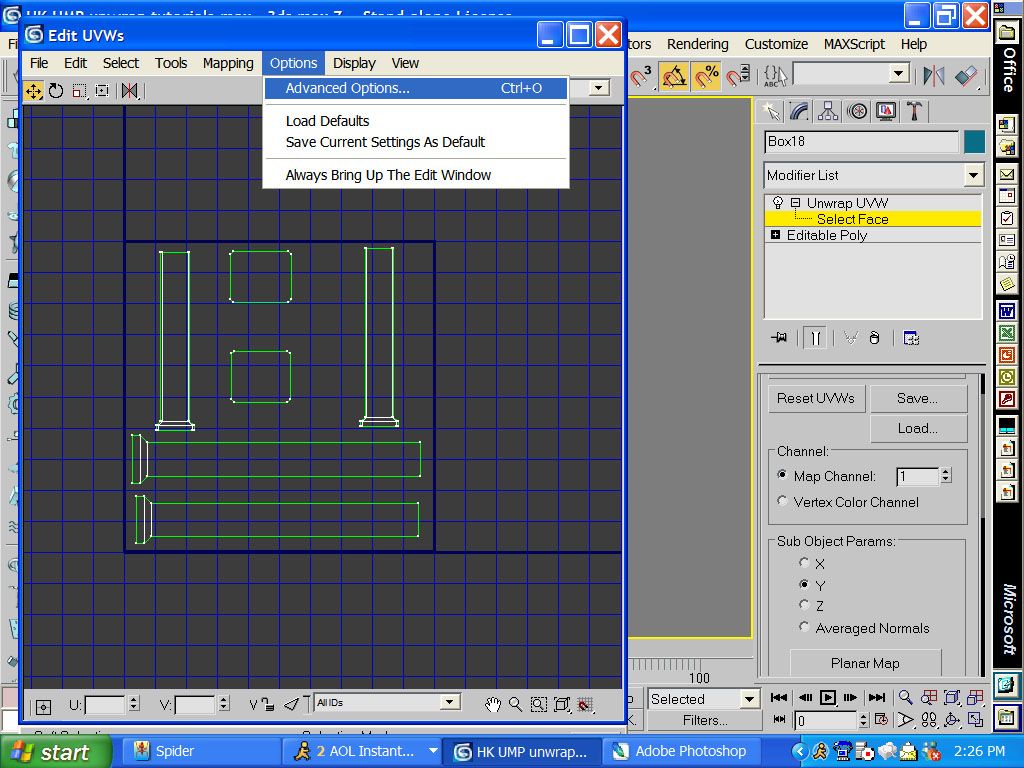
now go to advanced options
Image
now you have to change the size to 512 x 512 for most games.
Image
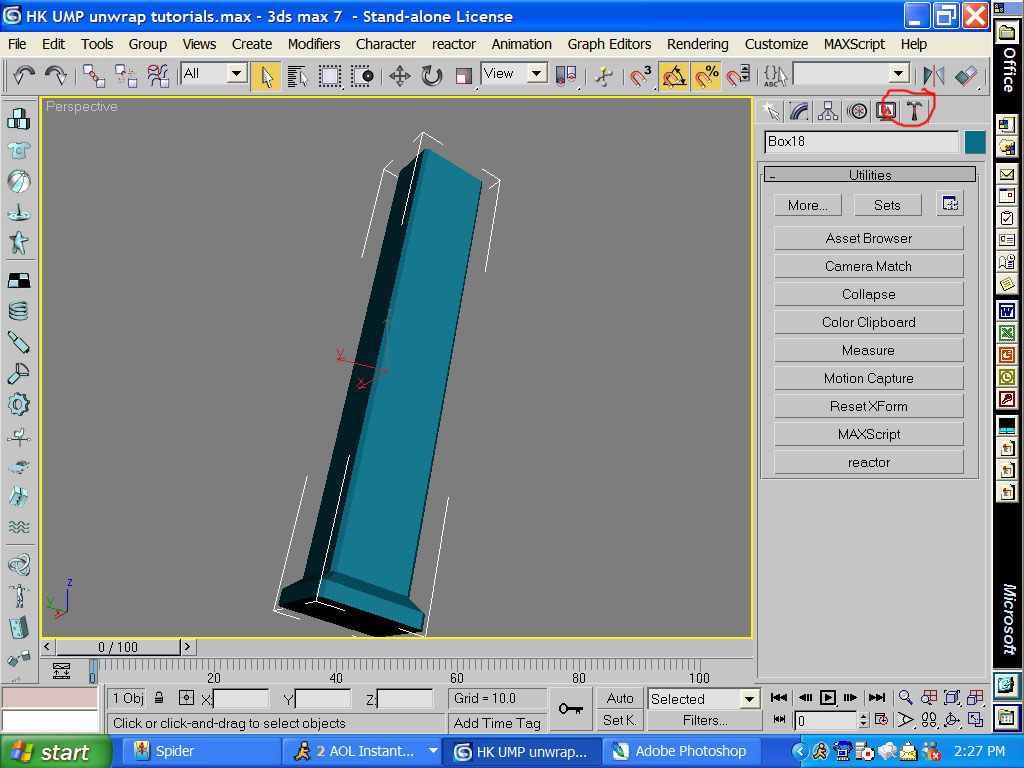
then click on the hammer button
Image
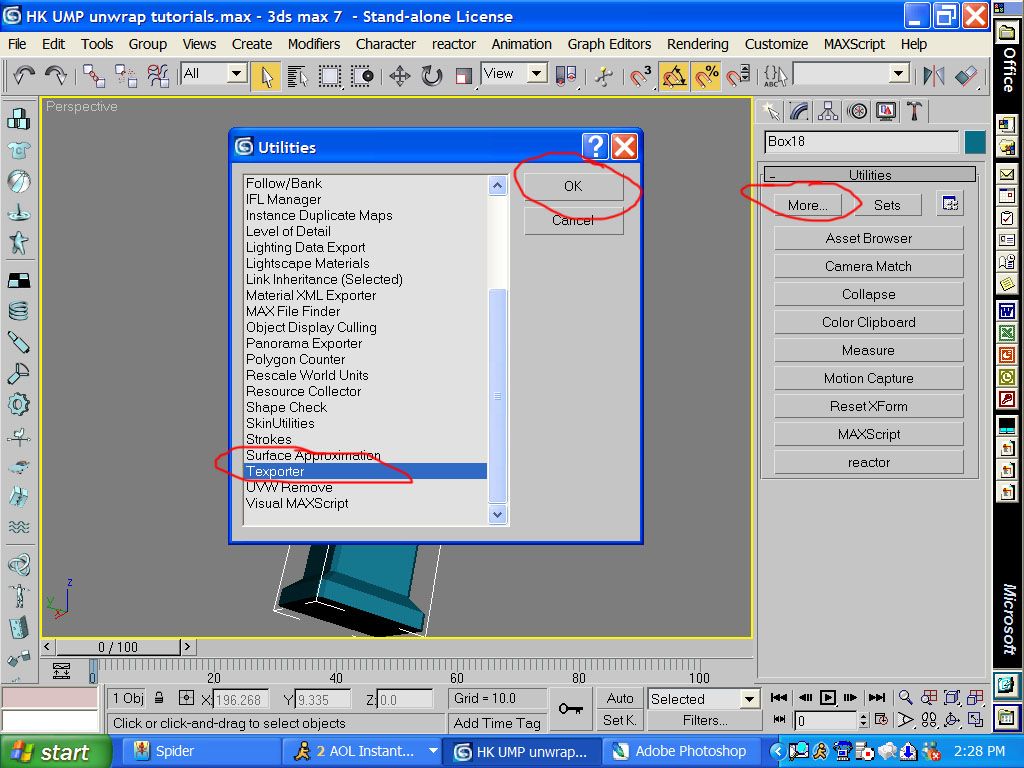
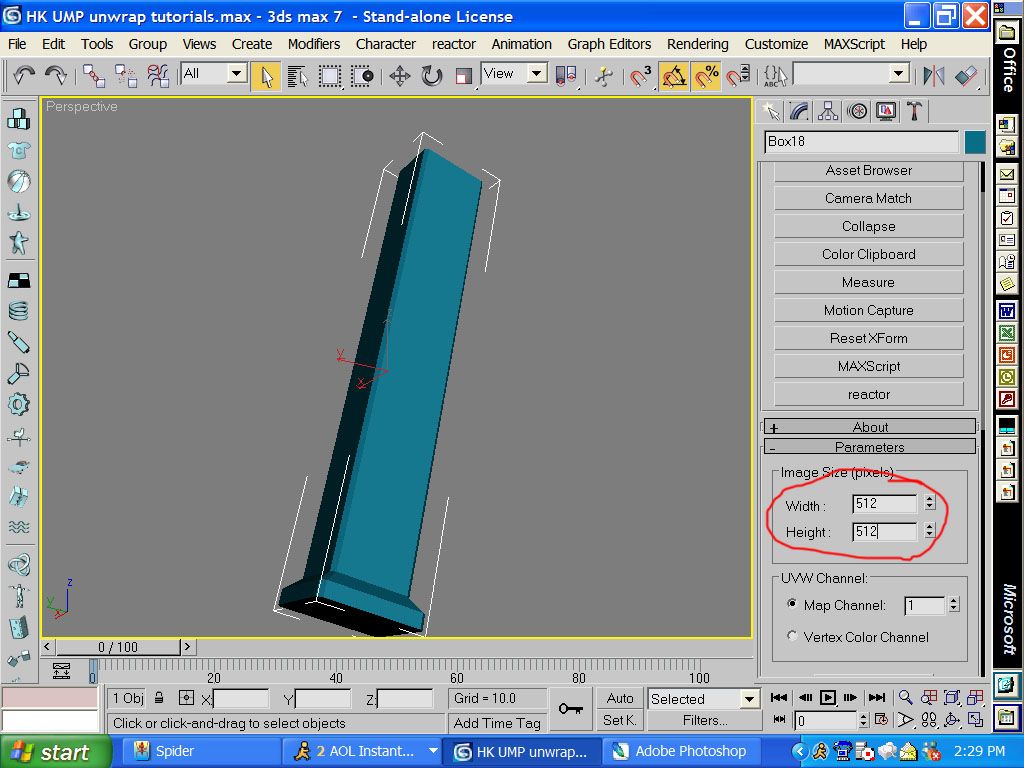
click on more. go to texporter and then click on ok
Image
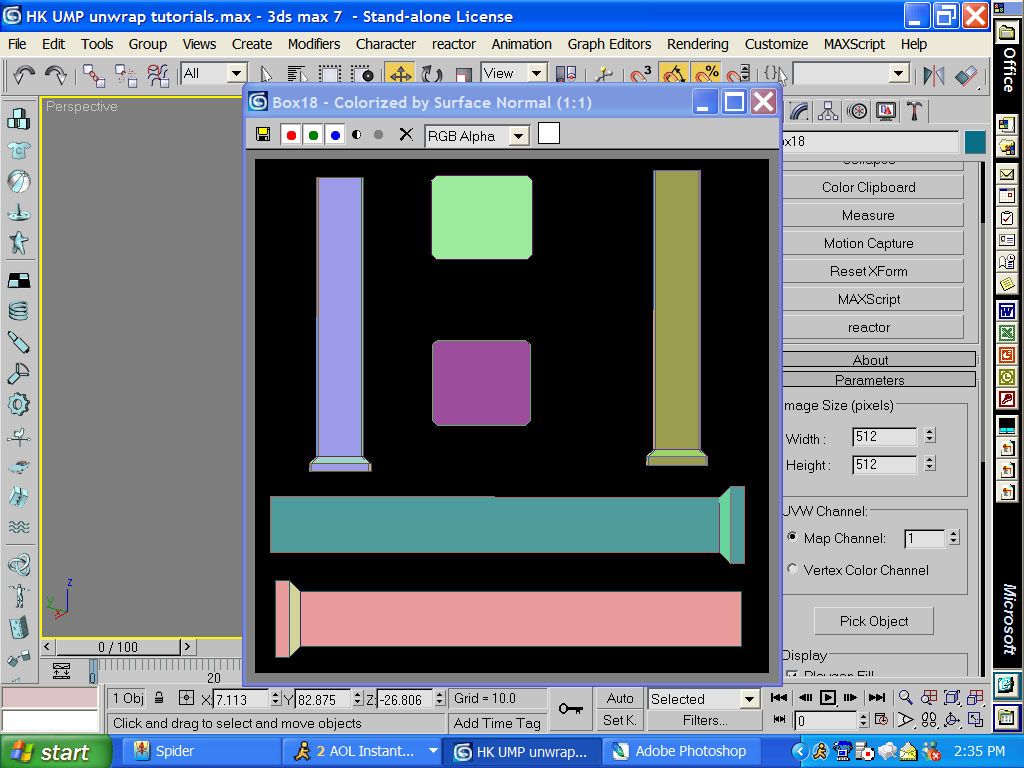
change the size to 512 x 512 to match what you did in advanced options.
Image
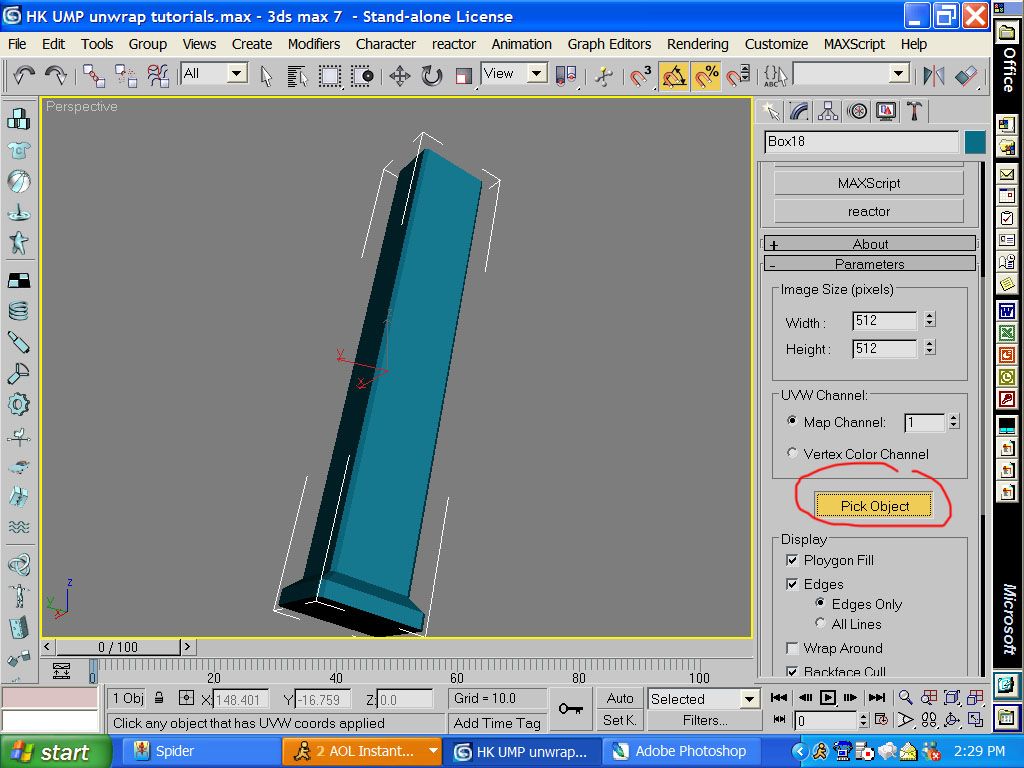
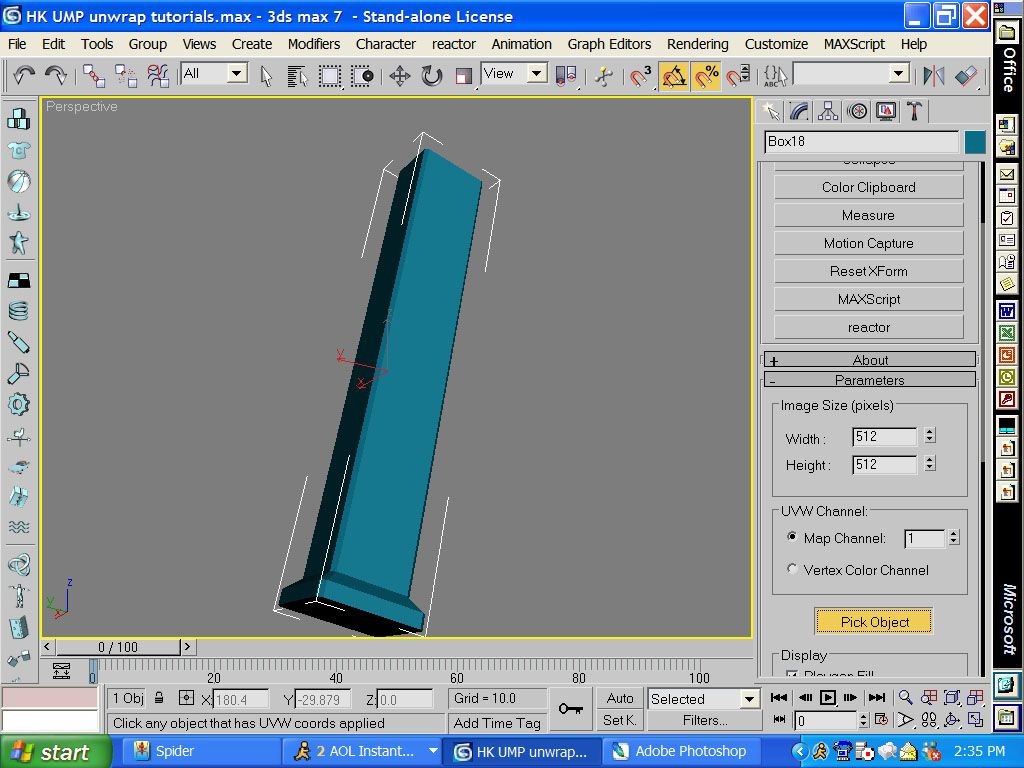
then click on pick object and select the clip.
Image
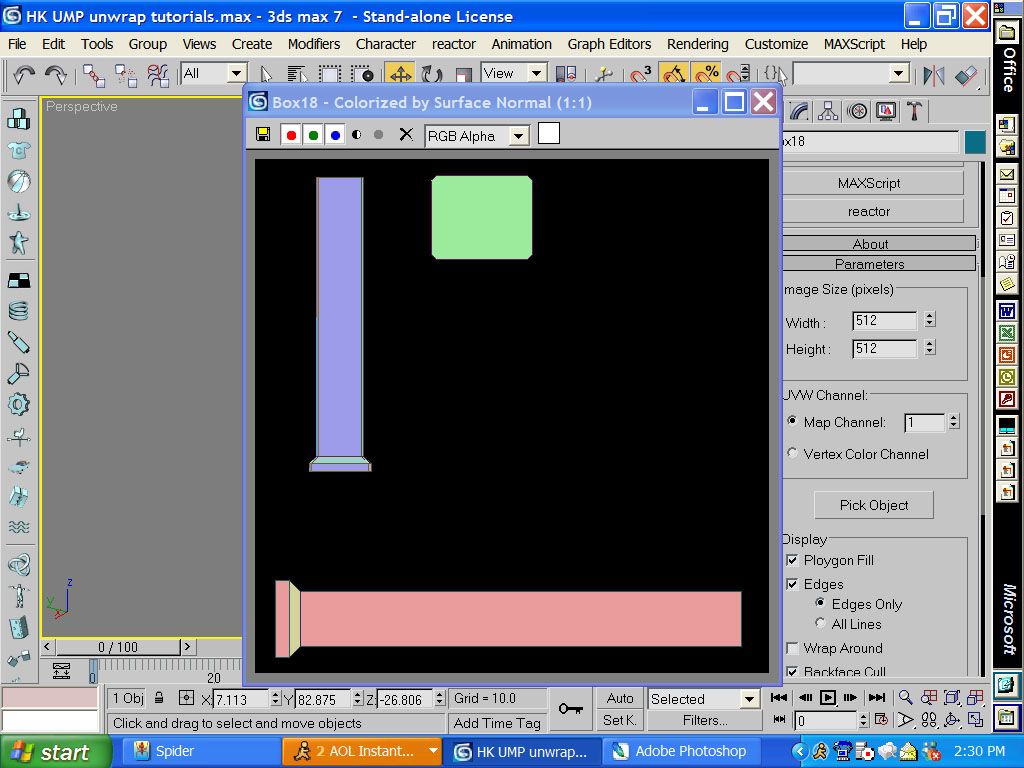
then this screen will come up. you will notice not everything is on it. dont panic.
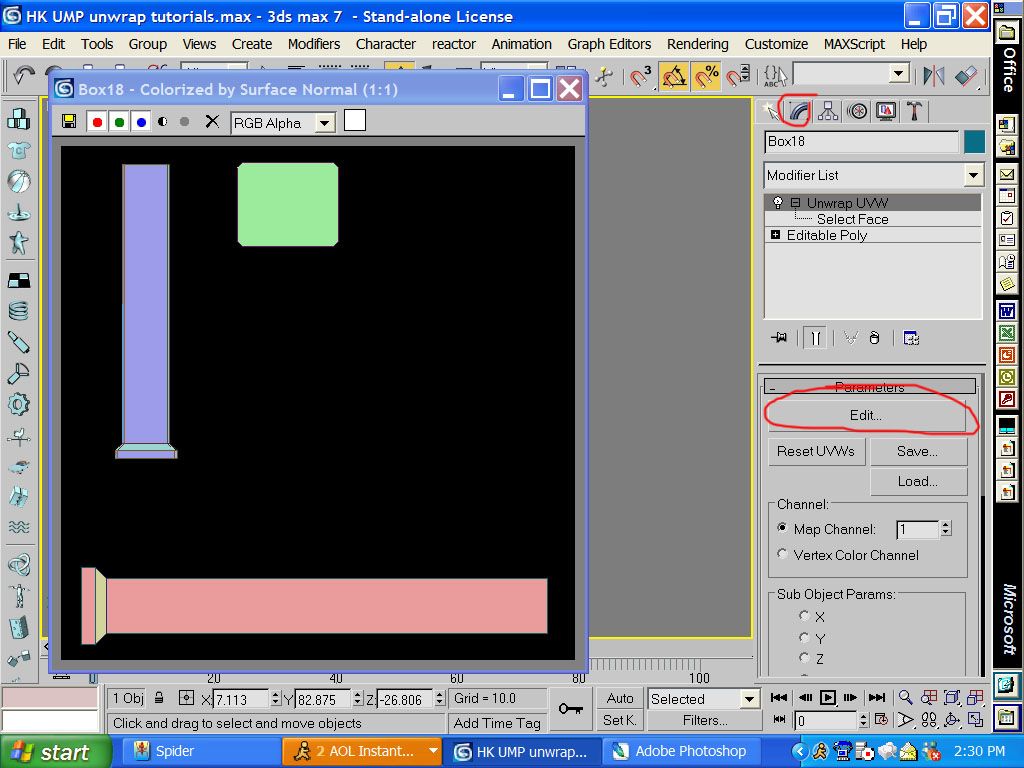
Image
leave the texporter screen up and go to the unwrap screen again
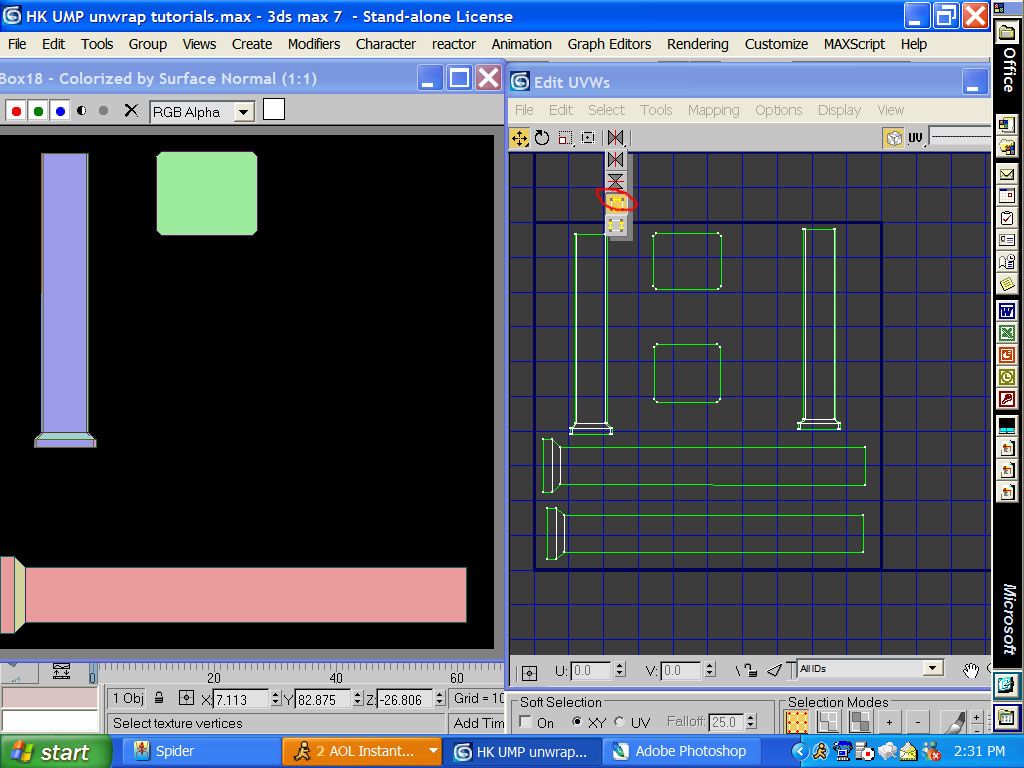
Image
then you have to see what isnt there. then u drag down the option with the yellow arrows (not sure of the name).
Image
then u select the peices that arent there and click that botton
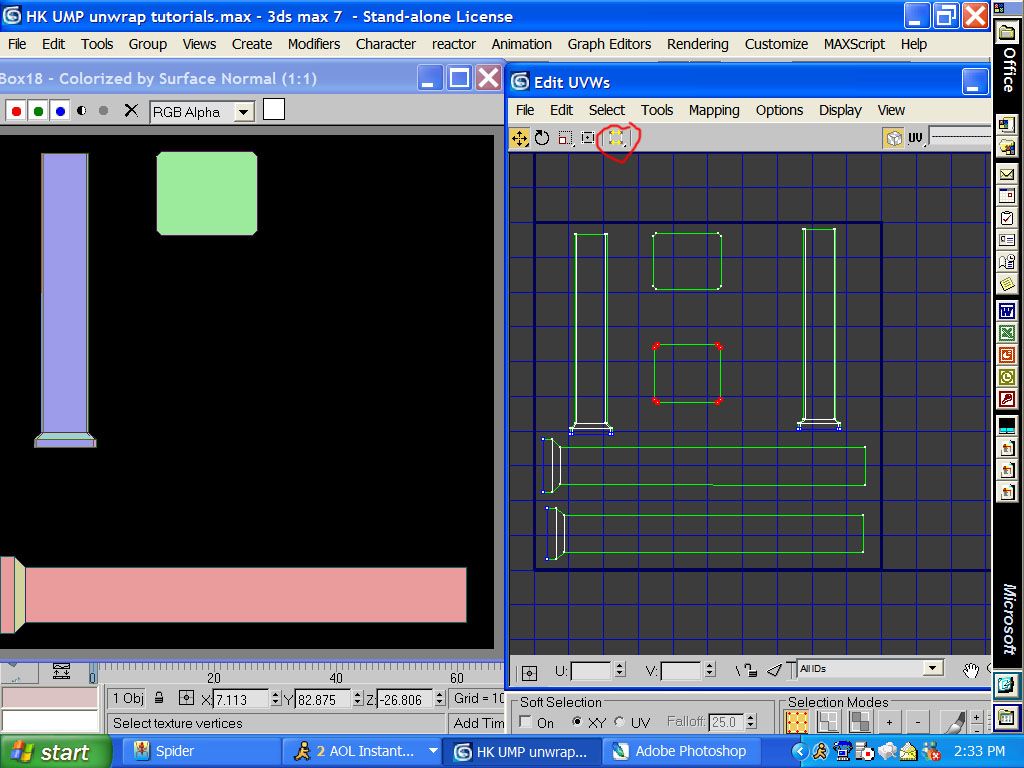
Image
click the middle (doesnt matter the order)
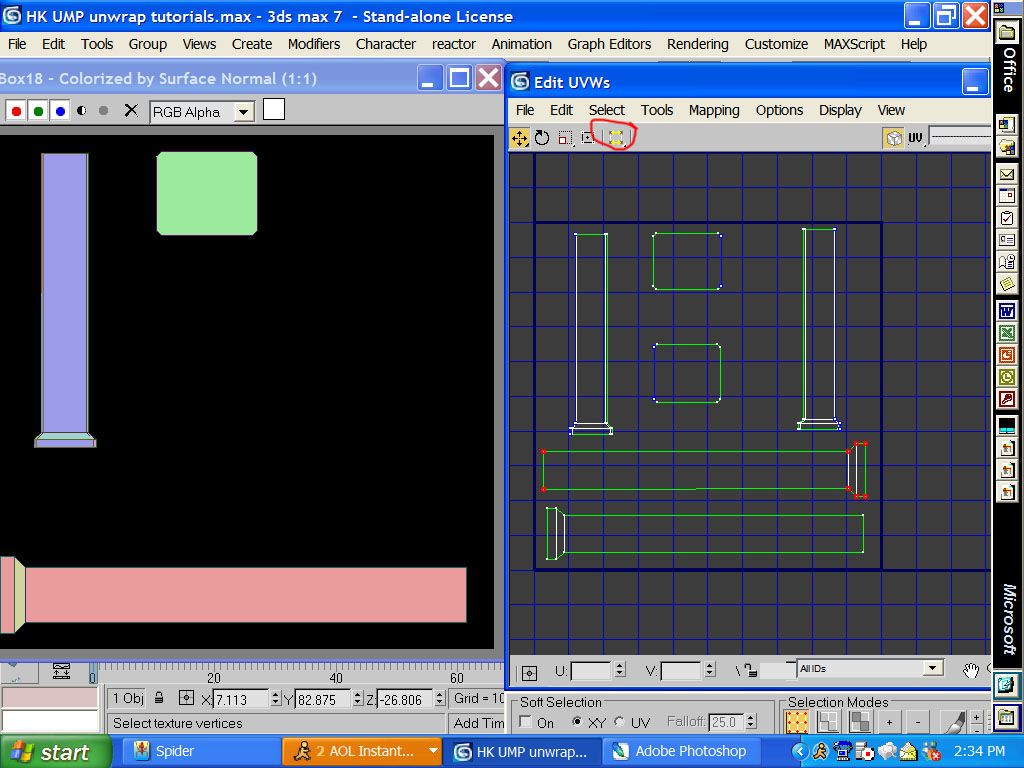
Image
then you will notice when you do it to this piece it goes backwards. its ok. just move it back into the box.
Image
then go back to texporter
Image
then click on the clip again and it will be fine
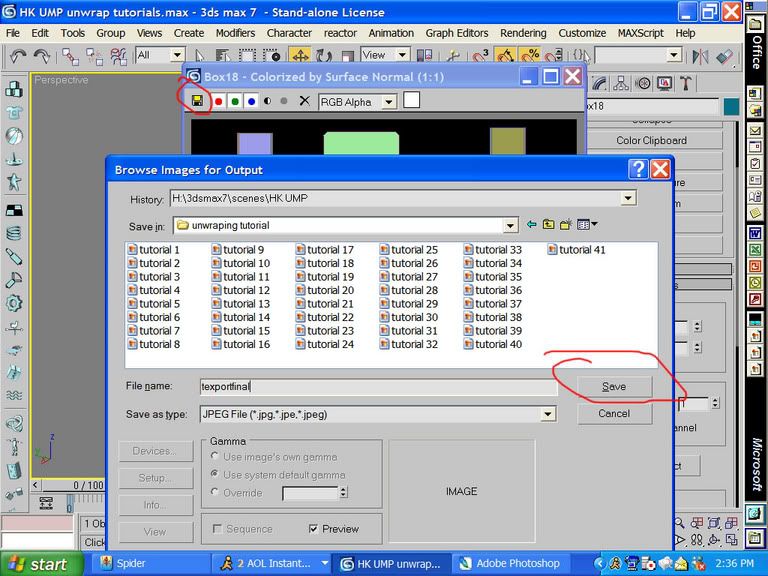
Image
now you want to save it somewhere
Image
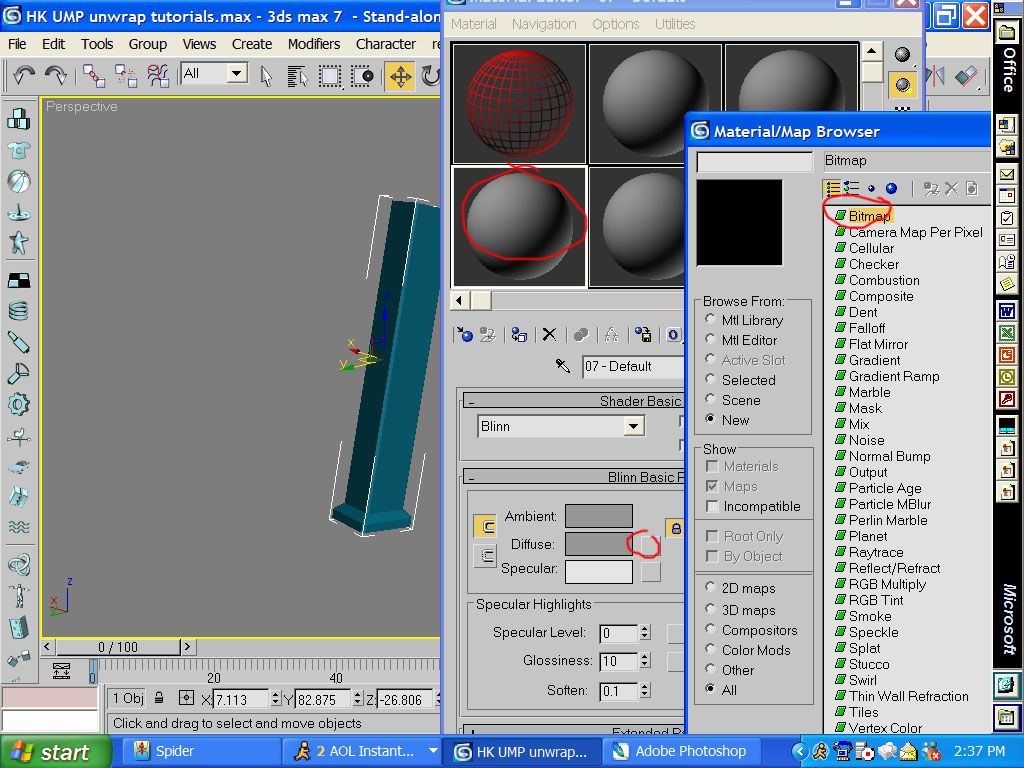
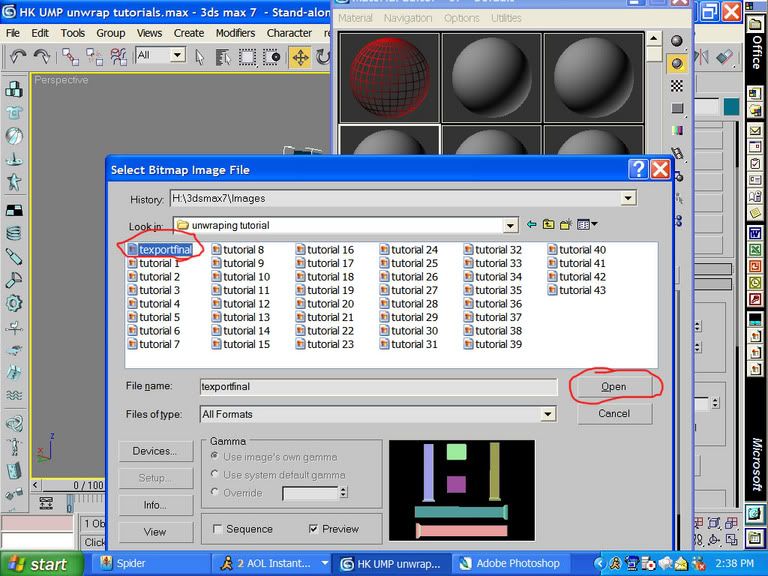
now press "M" to open the material editior. click the box next to diffuse and then double click on bitmap.
Image
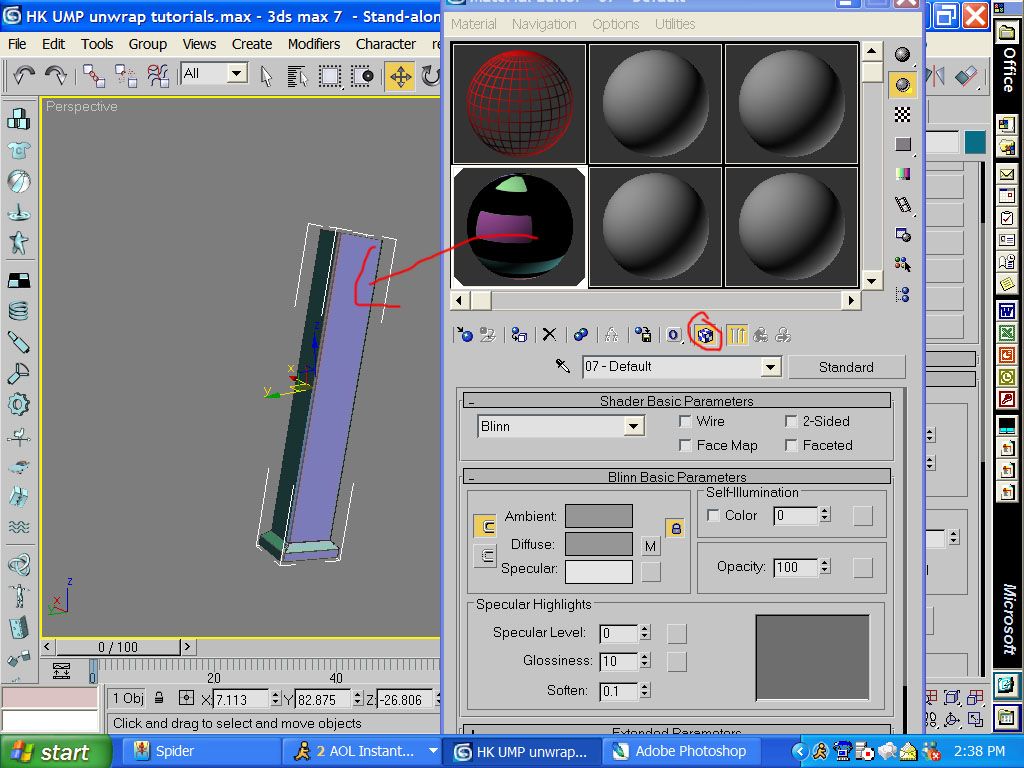
then open your textport .jpeg or whatever (you will have to make it a .tiff for halo in photoshop)
Image
then drag it onto the model. you have to click the doted box so the texture shows up.

Hope this helped. If you have any questions ask me on aol SPYD3RPAINTBALL
Aslo when you have the sides in the unwrap screen if you drag the side verts out the texture will look better. But i didn't do that i remebered to do that at the end.

-Falcons

Last edited by cooldude5990 on Sun Jun 19, 2005 11:25 am, edited 5 times in total.
Image
rossmum


Posts: 3178
Joined: Mon Mar 08, 2004 12:19 am
Location: in ur forums ownin ur noobs
Contact:

Post by rossmum »

THANK YOU!

*worship* *worship* *worship*

Does it work for Gmax too?
Patrickssj6


Pi Collaborator

Posts: 5426
Joined: Sat Jul 24, 2004 12:12 pm
Location: I'm a Paranoid
Contact:

Post by Patrickssj6 »

nice tutorial.I saw a vid tut about this and yours is better.
...left for good
Katarn


Posts: 1638
Joined: Tue Mar 02, 2004 10:18 am
Location: http://www.videotuts.net/
Contact:

Post by Katarn »

unfortunately, the video tutorial is better for explaining the techniques, but this tutorial is better for people not as well-versed in max, stickied.
Excalibur: id hunt him down and jerk him off
Excalibur: and drink the gallons of cum that come out
Sonictag


Wordewatician 500

Posts: 1241
Joined: Sun Aug 15, 2004 11:01 am
Location: England

Post by Sonictag »

kool tutorial, I would have stitched or welded them all together though, from the top, so it makes a + sort of shape.
cooldude5990


Posts: 540
Joined: Tue Jan 20, 2004 12:03 pm

Post by cooldude5990 »

thanks guys
and sonic tag i was gonna stich them but then the tutorail wouldve been really long picture wise. i was supprized photobucket let me upload all this in less than 15 min. I had to make a new username tho.
Image
Lord_Behemoth


Posts: 1
Joined: Wed Jun 29, 2005 3:16 am

Awsome work

Post by Lord_Behemoth »

Thank you very very much for this awsome tutorial. I have been searching
for ages for a good skinning tutorial and this one was very usefull.

thank you


a gratefull modeler (and now skinner :D )
Katarn


Posts: 1638
Joined: Tue Mar 02, 2004 10:18 am
Location: http://www.videotuts.net/
Contact:

Post by Katarn »

this isn't a skinning tutorial....
Excalibur: id hunt him down and jerk him off
Excalibur: and drink the gallons of cum that come out
Incindeary


Posts: 88
Joined: Fri Aug 26, 2005 4:16 pm
Location: Over the counter pills

Post by Incindeary »

Does this work for modeling things like "Blender?"
Please read the new signature policies!
Your avatar was oversized!
halobuddha


Posts: 834
Joined: Fri Oct 07, 2005 4:46 pm
Location: running around like a chicken w/o a head

Post by halobuddha »

nice tut i kan finaly model my weapon!!!!!!!!!!!1
Image
Hydra12345


Posts: 7
Joined: Thu Jan 26, 2006 1:35 pm

Post by Hydra12345 »

praps its just me, but every time i try this at the end i just get a gray box?? but if i just drag any picture in at the start i get the picture but then have to unrap it.
Kafziel


Posts: 11
Joined: Wed May 31, 2006 7:29 am
Location: Wired to the nexus, channeling energy
Contact:

Post by Kafziel »

This is absolutely everything I needed. Thank you(X 84758575).
Why do you fight... when you know you will lose?
http://s7.invisionfree.com/Nexusforums
a mammoth


Droplet

Posts: 1603
Joined: Fri Jul 15, 2005 7:01 pm

Post by a mammoth »

Thanks this tut is awesome, I can finally make a model with decent UVWs, But how do you UVW a cylinder?
Post Reply