Programming: The Very Basics (VB2005 Express) Part 1
Posted: Tue Mar 14, 2006 12:54 pm
Well as we all know everyones gotta start somewhere, so this tut will cover the basics of programming,
We will be using 'Visual Basic 2005 Express Edition'
1) When the program loads up you will find yourself on the startpage, to start a new project use the button in the top-left

2) Select windows application

3) The box at the bottom should now contain the words 'Windows Application1', change this to 'Organiser' as this is what we will be making. Click OK
4) You'll screen will now change around, you are now in the designer , you will have a form in the middle-left of the screen
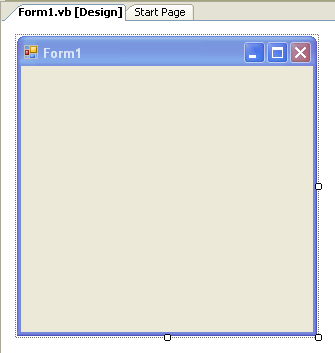
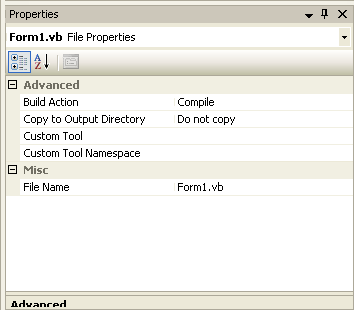
A properties window in the bottom-right
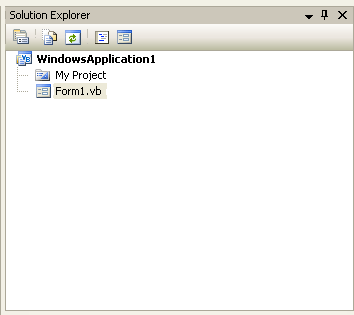
A solution explorer in the top-right
And error, warning and message lists at the bottom

All these windows can be moved around and resized to your liking with the mouse
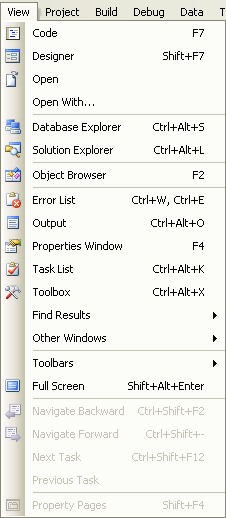
You may have also noticied that each window can also be closed, if at anytime you wish to reopen a window just use the 'view' menuitem at the top and select the window from the dropdown
5) 1st of all i will tell you how to save and distribute your app, around the top-left you should see a little button that looks like this:
Click it, this window should appear:
The 1st box is the name of your .exe, the 2nd box is the location it saves too and the 3rd box is the name of your project,
Fill out the information accordingly
Note: If this is checked and the location you enter in the 2nd box doesnt exist then it will be made
Now whenever you wish to save just click
6) Press F5 to enter 'debugging mode', all this does is compile your app so you can test it out, exit 'debugging mode' by clicking the red X on your app
You can alternatively enter/exit 'debugging mode' through the 'debug' menuitem

-----------

Compiling: This means that vb takes your project and converts it into numbers and letters which the computer can then understand, read and act accordingly, these numbers and letters are called binary
7) Open up the folder you saved your project to -> Go into the next folder -> Bin -> Debug; your compiled .exe will be here, this .exe is your app, it is remade everytime you press F5 in vb

 At the moment the app looks pretty crap so back in vb, doulble-click 'My Project' in the solutions explorer, another window will now come up with around 10tabs on the left, for now we'll just be worrying about the 1st tab
Just to name a few things: the 'Assembly Name' is the name of the project and the 'Root Namespace' is the name the app refers to itself as.
1st of all I'll show you how 2 change the the apps icon, there will be a dropdownbox with the word 'Icon' above it, open it up and select 'browse'
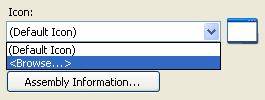
Browse through your PC until you find a suitable Icon (The FastIcons download page offers some pretty good ones: http://www.fasticon.com/downloads.html)
Save once you've done that, press F5 to compile, now you can go back into the 'bin' folder and see what it looks like
You will also notice that there is a line of text under the name that is slightly faded

it is possible to change that and furthermore add another line of text under that, back in vb click to bring up another window
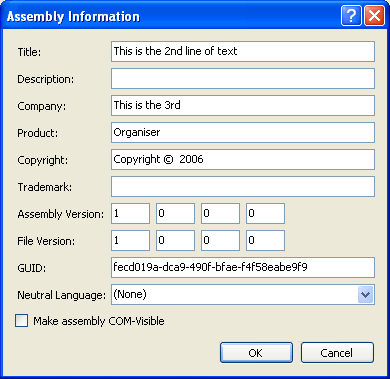
Once youve changed that, save and compile your app again and then check it out in the bin folder

9) Right, time to actually begin coding! Close down the 'My Project' Window so you can see your Form again, by default it is called form1
Click it, when you do you'll see the items in the 'properties window' will change, these are the properties of the form, this is where you can change its text, colour, size, location, style, visibility etc
Every item will have properties
The 1st thing an organiser needs is a button, we will use this to launch another program. To get a button you will need to open up the toolbox by clicking (top-right), the toolbox will appear on the left, as you can see there are loads of tools, all we will be usin though is the button, click an drag it onto the form
So now your form has a button, double-click the button and you will be brought to another window that should contain this code:
1st of all you must keep in mind that everything that has a beginning, must has an end
The 1st line of code (Public Class Form1) is ended by (End Class) as is (Private Sub) with (End Sub)
Any code that goes inbetween:
Will be used when the button is clicked, we know this because the last couple of lines tells us what it handles
Every item has a default handle, the button is button.click, but do not think that that is its only handle, god no, we'd get nowhere otherwise! Going back to the designer, this time just click the button once, now in the properties box there will be a button like:  , Click it. The properties window will now display something else, it will display a list of all the different handles the button can take, I will go more into this in a further lesson, for now all we need is button.click
So go back to the code window and put in the button1.click handle:
So your code should now look like:
Note: As you can see i have added '<-- Replace filepath with a program from your PC, if you copied this into your code you will notice it is a green colour, this is because it is a comment, you start a comment by simply putting an apostrophe at the start of the sentence, the app wont read this code, its just there so you remember what things are doing 
10) Press F5 and click the button, the program you chose should now come up, well done! you just made a basic organiser
I will be bringing out another tut soon that will cover more advanced basics, until then post any questions you may have on this.
One last thing is for other people to run your app they will need .net framework 2.0, this is just more advanced than 1.0/1.1. All it really is is a program running tool -> Download Page
We will be using 'Visual Basic 2005 Express Edition'
1) When the program loads up you will find yourself on the startpage, to start a new project use the button in the top-left

2) Select windows application

3) The box at the bottom should now contain the words 'Windows Application1', change this to 'Organiser' as this is what we will be making. Click OK
4) You'll screen will now change around, you are now in the designer

A properties window in the bottom-right

A solution explorer in the top-right

And error, warning and message lists at the bottom

All these windows can be moved around and resized to your liking with the mouse
You may have also noticied that each window can also be closed, if at anytime you wish to reopen a window just use the 'view' menuitem at the top and select the window from the dropdown

5) 1st of all i will tell you how to save and distribute your app, around the top-left you should see a little button that looks like this:

Click it, this window should appear:
The 1st box is the name of your .exe, the 2nd box is the location it saves too and the 3rd box is the name of your project,
Fill out the information accordingly
Note: If this
 is checked and the location you enter in the 2nd box doesnt exist then it will be made
Now whenever you wish to save just click

6) Press F5 to enter 'debugging mode', all this does is compile your app so you can test it out, exit 'debugging mode' by clicking the red X on your app
You can alternatively enter/exit 'debugging mode' through the 'debug' menuitem

-----------

Compiling: This means that vb takes your project and converts it into numbers and letters which the computer can then understand, read and act accordingly, these numbers and letters are called binary
7) Open up the folder you saved your project to -> Go into the next folder -> Bin -> Debug; your compiled .exe will be here, this .exe is your app, it is remade everytime you press F5 in vb

Just to name a few things: the 'Assembly Name' is the name of the project and the 'Root Namespace' is the name the app refers to itself as.
1st of all I'll show you how 2 change the the apps icon, there will be a dropdownbox with the word 'Icon' above it, open it up and select 'browse'

Browse through your PC until you find a suitable Icon (The FastIcons download page offers some pretty good ones: http://www.fasticon.com/downloads.html)
Save once you've done that, press F5 to compile, now you can go back into the 'bin' folder and see what it looks like
You will also notice that there is a line of text under the name that is slightly faded

it is possible to change that and furthermore add another line of text under that, back in vb click
 to bring up another window
Once youve changed that, save and compile your app again and then check it out in the bin folder

9) Right, time to actually begin coding! Close down the 'My Project' Window so you can see your Form again, by default it is called form1
Click it, when you do you'll see the items in the 'properties window' will change, these are the properties of the form, this is where you can change its text, colour, size, location, style, visibility etc
Every item will have properties
The 1st thing an organiser needs is a button, we will use this to launch another program. To get a button you will need to open up the toolbox by clicking
 (top-right), the toolbox will appear on the left, as you can see there are loads of tools, all we will be usin though is the button, click an drag it onto the form
So now your form has a button, double-click the button and you will be brought to another window that should contain this code:
Code: Select all
Public Class Form1

	Private Sub Button1_Click(ByVal sender As System.Object, ByVal e As System.EventArgs) Handles Button1.Click

	End Sub
End ClassThe 1st line of code (Public Class Form1) is ended by (End Class) as is (Private Sub) with (End Sub)
Any code that goes inbetween:
Code: Select all
Private Sub Button1_Click(ByVal sender As System.Object, ByVal e As System.EventArgs) Handles Button1.Click

End SubCode: Select all
Handles Button1.Click , Click it. The properties window will now display something else, it will display a list of all the different handles the button can take, I will go more into this in a further lesson, for now all we need is button.click
So go back to the code window and put in the button1.click handle:
Code: Select all
Process.Start("filepath") '<-- Replace filepath with a program from your PCCode: Select all
Public Class Form1

	Private Sub Button1_Click(ByVal sender As System.Object, ByVal e As System.EventArgs) Handles Button1.Click
		Process.Start("filepath") '<-- Replace filepath with a program from your PC
	End Sub
End Class10) Press F5 and click the button, the program you chose should now come up, well done! you just made a basic organiser
I will be bringing out another tut soon that will cover more advanced basics, until then post any questions you may have on this.
One last thing is for other people to run your app they will need .net framework 2.0, this is just more advanced than 1.0/1.1. All it really is is a program running tool -> Download Page