Halo 2 Rendering

They're the same basic thing, just finding out which model gets what shader is the only tricky part.Dalto11 wrote:that'd be awesome Tural, I have turf, and I was looking to extract the BSP myself. What about materials, are they nearly as hard to put into a BSP as they are on the MC
Tural that scenery BSP script sounds wonderful.
I used the updated model extractor and didn't have any holes in my model. Did I still need to do the part with the welding the verts, attaching everything, and unifying the faces?
Also, when I render the plain gray MC, I can barely see anything in the render. Do I need to set up a light or something to make it look like the pictures? Any plans for a tutorial on lighting?
Also, when I render the plain gray MC, I can barely see anything in the render. Do I need to set up a light or something to make it look like the pictures? Any plans for a tutorial on lighting?


I have the clean Scenery BSP scripts batch extracted from my maps, but I don't know of any way to have a Maxscript use a specific material library. (In fact, I can't get it to use one at all) So for now, you'd have to manually apply materials based on guessing which material goes on which mesh. I'm also manually working on some rotation coordinates of some main pieces (Coag base supports, trees, Headlong light poles, etc). I'll post whatever I finish tonight or tomorrow (I'd put my money on tomorrow)
you only need to weld and so on if you plan on actually rigging and using the model...it is considerably easier to skin and rig one big mesh than five separate, unconnected ones. also, it shades better to rig it...watch out for unify, though, if you don't see any flipped polys, don't mess with it.DWells55 wrote:I used the updated model extractor and didn't have any holes in my model. Did I still need to do the part with the welding the verts, attaching everything, and unifying the faces?
first, change the background from (I assume) the default black to something else...I usually use a deep blue or red, depending on the object. Go to Rendering>environment and change the background color.Also, when I render the plain gray MC, I can barely see anything in the render. Do I need to set up a light or something to make it look like the pictures? Any plans for a tutorial on lighting?
as for a simple light setup, it's easy to do. just add a skylight with intensity of <.5, and set up a few omnis, perhaps one straight in front of the Chief, and one at 45 degrees to either side, all about a meter or more away from him. then make one or two behind him...but make sure all your omnis are instances of one another. make their intensity <.3, depending on how many you have, and enable shadow maps. play with the intensitys, distances and so forth....but also be sure to make your "imitation" light setup mimic what you plan to use for "real" renders....if you'll be having only nighttime scenes, then be sure to make it dimmer than normal. I leave the color at default blaring deer-eye-white, but some people don't agree with that decision...but when first building materials, I prefer not tuning everything a certain way, then discovering the color was off because my light was green.
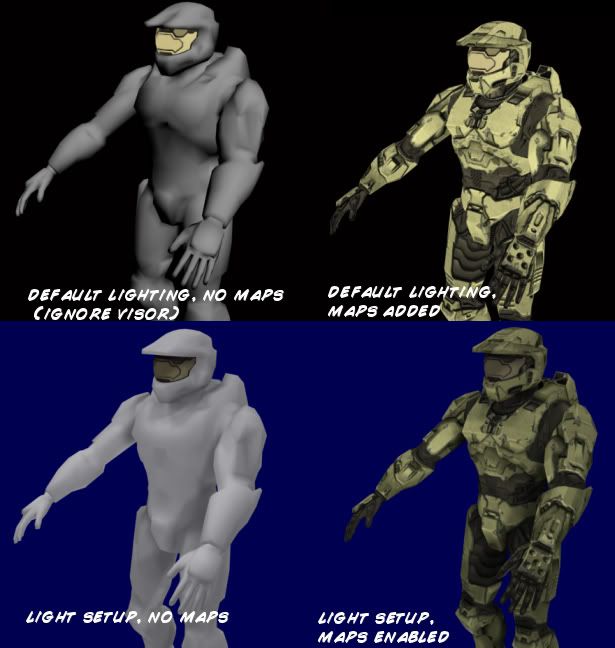
heh, obviously this results in less-than-game-exact shading...
Last edited by TelTura on Fri Apr 06, 2007 12:19 am, edited 1 time in total.
Alright, here's three scripts, Coagulation, Headlong, and Lockout.
Note: I didn't bother with every little piece's rotation, but I believe I've covered most, if not all, of the most important ones.
Note: I didn't bother with every little piece's rotation, but I believe I've covered most, if not all, of the most important ones.
- In Entity, select the [sbsp] tag of your map and click the blue circle in the top right, choose "Export Mesh to OBJ" (Note: Singular, not multiple)
- Find wherever you want to save it and name it something like "mapnamebsp.obj"
- Now go back to Entity and and click the blue circle, this time choosing "Export Meshes to .OBJs" and choose a folder to save them to.
- In that folder you'll now see several files named "mapname-Permutation[#]" - These are the important pieces, you do not need any of the others (Don't accidentally delete your single BSP mesh)
- Place my script for the correct map in the same folder as these Permutation files
- Open 3ds and make sure you don't have any meshes named "default" - If you have the BSP mesh imported, make sure it is centered at the origin (0, 0, 0)
- Go to the "Maxscript" section of the menu, choose "Run Maxscript"
- Navigate to where ever you put the Maxscript and meshes, and run the script.
- When it finishes, you should have every Scenery BSP mesh correctly placed (Many correctly rotated) and named as they are named in the map files.
- Attachments
-
- CHL Maxscripts.rar
- Final
- (4.73 KiB) Downloaded 21 times
Last edited by Tural on Fri Apr 06, 2007 4:02 pm, edited 2 times in total.


